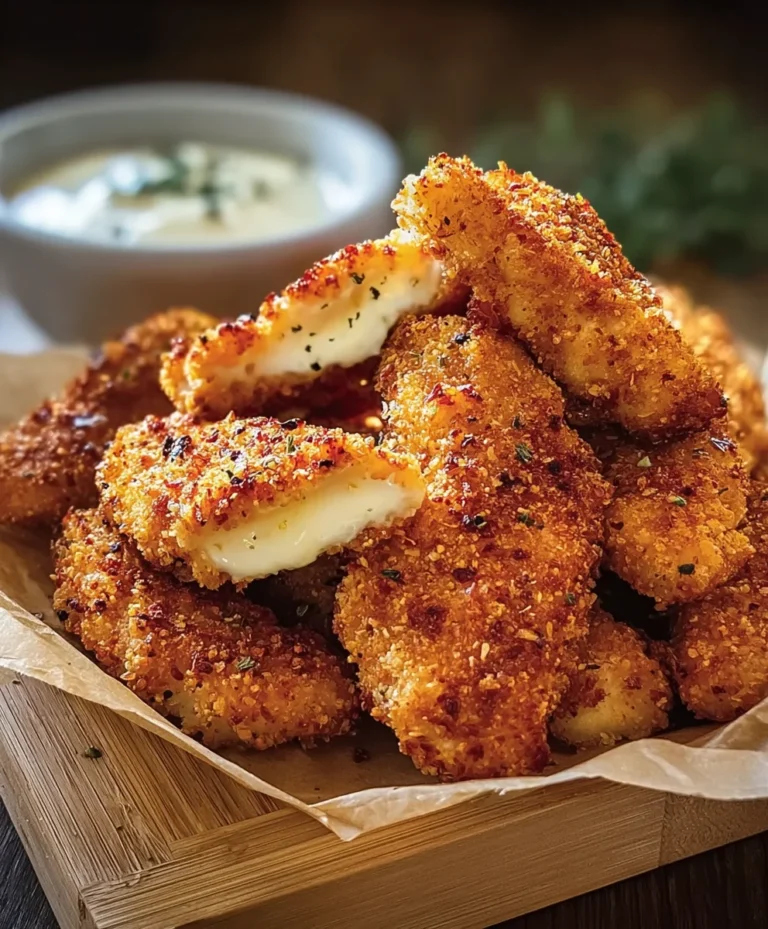
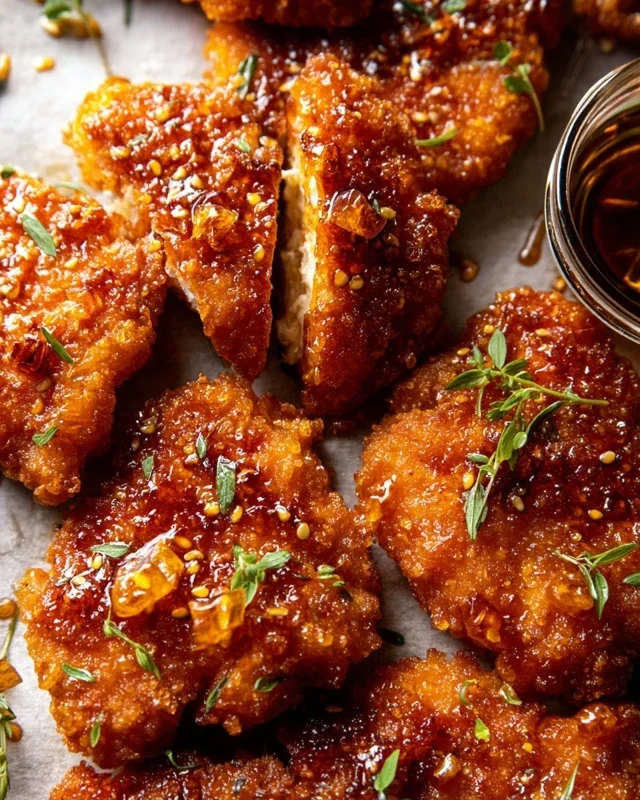
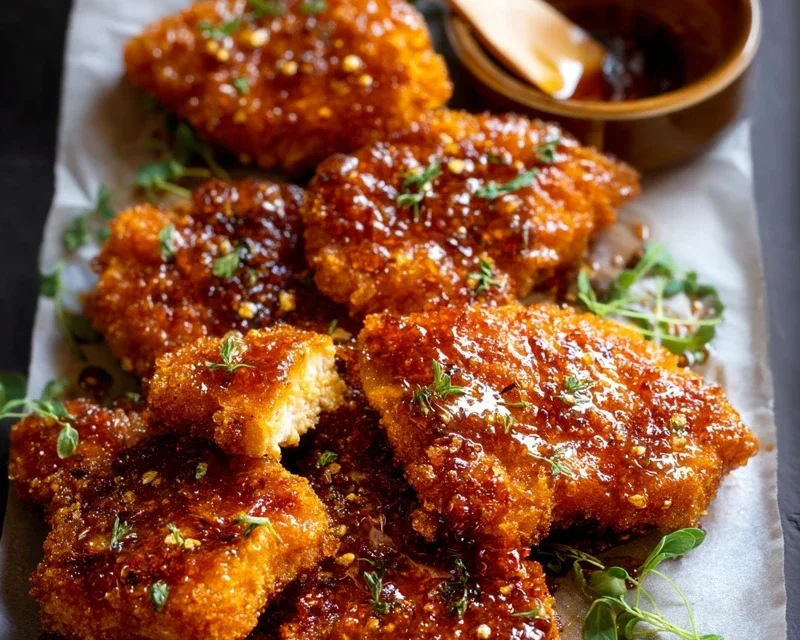
Crunchy Hot Honey Chicken – Easy Baked Recipe
Baked Crunchy Hot Honey Chicken is the dinner you’ve been dreaming of. Imagin extracte tender, juicy chicken pieces coated in a crispy, golden crust, then drizzled with a sweet and spicy hot honey glaze that has just the right amount of kick. This dish has captured hearts (and taste buds!) everywhere for a very good reason: it’s an incredible balance of textures and flavors that’s surprisingly easy to achieve in your own kitchen. Forget greasy takeout or complicated frying methods; our Baked Crunchy Hot Honey Chicken delivers that irresistible crunch without the mess. What truly makes this baked hot honey chicken shine is its adaptability and the sheer comfort it brings to any meal. It’s the perfect centerpiece for a weeknight family dinner or a crowd-pleasing appetizer that will have everyone asking for the recipe.
Baked Crunchy Hot Honey Chicken
Get ready for a flavor explosion that’s both incredibly satisfying and surprisingly simple to make! We’re talking about Baked Crunchy Hot Honey Chicken – a dish that perfectly balances sweet, spicy, and savory with a delightful crispy texture that’ll have everyone asking for seconds. Forget greasy fried chicken; this baked version delivers all the crunch and flavor you crave without the mess. The secret? A clever coating that gets wonderfully golden and crisp in the oven, and a luscious, sticky hot honey sauce that coats every piece in pure deliciousness. This is the kind of recipe that becomes a weeknight staple and a guaranteed crowd-pleaser. Let’s dive into what you’ll need and how to bring this fantastic meal to life.
Ingredients:
Cooking Instructions:
This recipe is broken down into a few key phases to ensure perfect results every time. We’ll start with preparing our crunchy coating, then move on to getting the chicken ready, baking it to golden perfection, and finally, coating it in that irresistible hot honey glaze.
1. Preparing the Crunchy Coating
The first step to achieving that incredible crunch is all about the cornflake coating. Take your 6 cups of cornflakes and place them into a large zip-top bag or a food processor. If using a zip-top bag, grab a rolling pin or the flat side of a meat mallet and gently crush the cornflakes until they resemble coarse crum extractbs. You don’t want them to be a fine powder; we’re looking for some texture for that satisfying crispiness. Once crushed, pour these into a shallow dish or pie plate. To this, add your 1/4 cup of grated parmesan cheese, 1 teaspoon of smoked paprika, 1/2 teaspoon of onion powder, and 1/2 teaspoon of garlic powder. Give everything a good stir to combine these dry ingredients evenly. This mixture is going to form the delicious, savory crust for our chicken.
2. Setting Up the Wet Coating Station
In a separate shallow dish or pie plate, whisk together your 2 large eggs and 2 tablespoons of your favorite hot sauce. The hot sauce not only adds a subtle layer of flavor and heat to the chicken itself but also helps the cornflake mixture adhere beautifully. Ensure the eggs are thoroughly beaten until no streaks of white remain; this will create a consistent coating. Now, we have our two key stations ready for breading: the wet egg mixture and the dry crunchy coating.
3. Breading the Chicken Tenderloins
Now it’s time to get your hands (or tongs!) a little messy and bread the chicken. Pat your 2 pounds of chicken breast tenderloins dry with paper towels. This is an important step as it helps the coating stick better. Working with one tenderloin at a time, dip it into the beaten egg mixture, ensuring it’s fully coated. Let any excess egg drip off for a moment. Then, carefully transfer the egg-coated chicken into the cornflake mixture. Press the chicken down gently into the crum extractbs, making sure it’s thoroughly coated on all sides. You can even scoop some of the crum extractbs over the top to ensure a thick, even layer of crunch. Place the breaded tenderloins onto a baking sheet that has been lightly greased or lined with parchment paper, ensuring they aren’t overcrowded. Repeat this process with all the chicken tenderloins. For an extra golden and crispy finish, you can lightly drizzle the tops of the breaded chicken with a little extra virgin extract olive oil. This helps the coating to crisp up beautifully in the oven.
4. Baking the Chicken to Perfection
Preheat your oven to 400°F (200°C). Arrange your breaded chicken tenderloins on the prepared baking sheet, making sure there’s a little space between each piece. This allows the hot air to circulate, promoting even cooking and crisping. Bake for 20-25 minutes, or until the chicken is cooked through and the coating is golden brown and crispy. The exact baking time will depend on the thickness of your tenderloins. You want to see that beautiful golden hue and hear that satisfying crunch when you tap one lightly. Resist the urge to move them around too much during baking, as this can cause the coating to break.
5. Crafting and Glazing with the Hot Honey Sauce
While the chicken is baking, it’s time to prepare the star of the show: the hot honey glaze. In a small saucepan, combine the 1/2 cup of honey, 2-3 tablespoons of hot sauce (adjust to your spice preference!), 1-3 teaspoons of cayenne pepper (again, adjust for heat!), 3/4 teaspoon of chipotle chili powder for a smoky kick, 1/2 teaspoon of garlic powder, and 1/2 teaspoon of onion powder. Place the saucepan over medium-low heat. Stir the ingredients together until the honey is warm and all the spices are well incorporated. Let this mixture simmer gently for about 2-3 minutes, stirring occasionally, until it slightly thickens. Be careful not to let it boil vigorously. Once your chicken is done baking and has achieved that perfect golden crunch, carefully remove the baking sheet from the oven. Let the chicken rest for just a minute or two on the baking sheet. Then, generously brush or toss the hot honey glaze all over the hot, crispy chicken tenderloins. You can do this by either brushing the glaze onto each piece individually or by placing the cooked chicken back into a clean bowl and tossing it gently with the glaze until evenly coated. Serve immediately and enjoy the incredible combination of crunchy, sweet, and spicy!
Conclusion:
There you have it – a foolproof guide to creating incredibly delicious Baked Crunchy Hot Honey Chicken! This recipe truly is a winner because it delivers that irresistible combination of crispy, golden-brown exterior and juicy, tender chicken, all coated in a perfectly balanced sweet and spicy hot honey glaze. It’s surprisingly simple to make, proving that restaurant-quality flavor can absolutely be achieved in your own kitchen. Whether you’re looking for a crowd-pleasing weeknight dinner or a dish to impress guests, this Baked Crunchy Hot Honey Chicken is sure to become a favorite.
I love serving this chicken with a side of fluffy rice, creamy coleslaw, or even some roasted sweet potatoes for a complete and satisfying meal. Don’t be afraid to experiment with variations either! For an extra kick, add a pinch of cayenne pepper to the flour dredge. If you prefer a milder heat, simply reduce the amount of chili flakes in your hot honey. The possibilities are endless, and the results are always spectacular. I truly encourage you to give this recipe a try – you won’t regret it!
Frequently Asked Questions:
Can I make the hot honey glaze ahead of time?
Absolutely! You can easily prepare the hot honey glaze a day or two in advance and store it in an airtight container in the refrigerator. Simply warm it gently on the stovetop or in the microwave before drizzling it over your baked chicken.
What’s the best way to ensure the chicken stays crispy?
The key to achieving that perfect crunch is a combination of a good dredgin extractg process and baking on a wire rack set inside a baking sheet. This allows air to circulate around the chicken, preventing it from becoming soggy and ensuring an even crispiness all around.
Can I use different types of chicken for this recipe?
Yes, you can! While chicken thighs are generally more forgiving and stay juicier, you can also use chicken breasts. Just be mindful of the baking time, as breasts cook faster and can dry out if overcooked. Aim for an internal temperature of 165 degrees Fahrenheit.
Baked Crunchy Hot Honey Chicken
Crispy baked chicken tenderloins coated in a spicy and sweet hot honey glaze.
Ingredients
-
6 cups cornflakes
-
1/4 cup grated parmesan cheese
-
1 teaspoon smoked paprika
-
1/2 teaspoon onion powder
-
1/2 teaspoon garlic powder
-
2 large eggs, beaten
-
2 tablespoons hot sauce
-
2 pounds chicken breast tenderloins
-
extra virgin olive oil, for drizzling
-
1/2 cup honey
-
2-3 tablespoons hot sauce
-
1-3 teaspoons cayenne pepper
-
3/4 teaspoon chipotle chili powder
-
1/2 teaspoon garlic powder
-
1/2 teaspoon onion powder
Instructions
-
Step 1
Preheat oven to 400°F (200°C). Line a baking sheet with parchment paper. -
Step 2
In a shallow dish, combine cornflakes (crushed if desired), parmesan cheese, smoked paprika, 1/2 teaspoon onion powder, and 1/2 teaspoon garlic powder. In another shallow dish, whisk together eggs and 2 tablespoons hot sauce. -
Step 3
Dip each chicken tenderloin first into the egg mixture, then coat thoroughly with the cornflake mixture, pressing to adhere. -
Step 4
Place coated chicken on the prepared baking sheet and drizzle with olive oil. -
Step 5
Bake for 20-25 minutes, or until chicken is cooked through and golden brown, flipping halfway through. -
Step 6
While chicken bakes, prepare the hot honey glaze: In a small saucepan over low heat, combine honey, 2-3 tablespoons hot sauce, cayenne pepper, chipotle chili powder, 1/2 teaspoon garlic powder, and 1/2 teaspoon onion powder. Stir until well combined and slightly warmed. -
Step 7
Once chicken is baked, remove from oven and generously brush with the hot honey glaze. Return to oven for an additional 2-3 minutes to let the glaze set.
Important Information
Nutrition Facts (Per Serving)
It is important to consider this information as approximate and not to use it as definitive health advice.
Allergy Information
Please check ingredients for potential allergens and consult a health professional if in doubt.