My Fave Birria Tacos Recipe-Authentic Flavor
My Fave Birria Tacos are more than just a meal; they’re an experience, a culinary adventure that has captivated my taste buds and I’m betting they’ll do the same for you. If you’ve ever had the pleasure of biting into a perfectly crispy, saucy, and impossibly tender birria taco, you already understand the magic. It’s that deeply savory, slow-cooked consommé, rich with chiles and spices, that transforms shredded beef into something truly extraordinary. This isn’t your average taco; it’s a labor of love that rewards every minute of simmering with unparalleled depth of flavor. What makes my fave birria tacos so special is the perfect balance of spicy, tangy, and earthy notes, all wrapped up in a warm tortilla and served with that iconic, soul-warming dipping broth.
Prepare to fall in love.
This recipe will guide you through creating birria tacos that are simply unforgettable.

My Fave Birria Tacos
Birria tacos. Just the name itself conjures up images of rich, savory broth, tender, fall-apart meat, and perfectly crispy tortillas. For the longest time, I thought making authentic birria at home was a culinary Everest I’d never conquer. I pictured lengthy marinating times, obscure ingredients, and hours upon hours of simmering. But let me tell you, after much experimentation and a few delicious (and some less-than-delicious) attempts, I’ve landed on a recipe that is not only incredibly flavorful but also surprisingly manageable. This is my absolute favorite way to make birria tacos, a dish that has become a staple in my kitchen for its comforting warmth and explosive flavor.
The magic of birria lies in its complex spice blend and the slow cooking process that transforms tough cuts of meat into something utterly divine. This recipe focuses on achieving that deep, authentic taste without requiring a full day’s commitment. We’ll be using dried chiles to build our flavor base, along with a pantry-friendly selection of spices that work in perfect harmony. The resulting broth is so good, you’ll want to drink it straight from the bowl, and the shredded meat is perfect for stuffing into those crispy, cheesy tacos. Get ready to impress yourself and anyone lucky enough to share these with you.
Ingredients:
Cooking Instructions:
Phase 1: Preparing the Chile Base
This is where all the flavor begin extracts! First, you’ll want to prepare your dried chiles. Carefully remove the stems and seeds from the guajillo and ancho peppers. A quick way to do this is to cut them open lengthwise and then shake out the seeds. Don’t worry if you can’t get every single seed; a few stray ones won’t hurt. Next, place the stemmed and seeded dried chiles in a bowl and cover them with boiling water. Let them soak for about 20-30 minutes, or until they are softened and pliable. This rehydrates them, making them easier to blend into a smooth paste.
While the chiles are soaking, let’s get our aromatics ready. Chop your onion and have your garlic cloves peeled and ready to go. Once the dried chiles are rehydrated, drain them, reserving a little of the soaking liquid. Place the softened dried chiles into a blender along with the chopped onion, peeled garlic cloves, crushed tomatoes, beef stock, apple cider vinegar, and the adobo sauce from the chipotle peppers. Add all the dried spices: Mexican oregano, dried thyme, cumin, ground cinnamon, smoked paprika, and ground allspice. Blend until you have a smooth, thick paste. If the mixture is too thick to blend, add a tablespoon or two of the reserved chile soaking liquid or the beef stock until you achieve a smooth consistency. This paste is the heart of your birria, so take your time to get it nice and smooth.
Phase 2: Browning and Simmering the Meat
Now it’s time to get some color on our beef. Pat your beef pieces dry with paper towels and season them generously with salt and freshly ground black pepper. Heat the vegetable oil in a large Dutch oven or heavy-bottomed pot over medium-high heat. Once the oil is shimmering, carefully add the beef pieces in batches, being careful not to overcrowd the pot. You want to sear each side of the beef until it’s nicely browned. This browning process is crucial for developing deep flavor through the Maillard reaction. Remove the browned beef from the pot and set it aside.
Once all the beef is browned, add the prepared chile paste to the same pot. Cook, stirring constantly, for about 2-3 minutes, until it becomes fragrant. This step helps to toast the spices and deepen their flavor. Pour in the remaining beef stock (if you used some in the blender, add more to reach the 1/2 cup total, or just use water if you’re out) and scrape up any browned bits from the bottom of the pot. Return the browned beef to the pot, along with the bay leaves. Add enough water or beef stock to almost cover the meat. Bring the liquid to a simmer, then reduce the heat to low, cover the pot tightly, and let it simmer gently for at least 2.5 to 3 hours, or until the beef is incredibly tender and easily shreds with a fork. The longer it simmers, the more the flavors will meld and the more tender the meat will become. I often find myself letting it go even longer if I have the time, as the results are always worth it.
Phase 3: Shredding the Meat and Consommé
Once the beef is fork-tender, carefully remove the pieces from the pot and place them on a cutting board. Let them cool slightly so you can handle them. While the meat is cooling, you can attend to the cooking liquid. Remove and discard the bay leaves. If you want a smoother consommé, you can strain the liquid through a fine-mesh sieve, pressing down on the solids to extract as much flavor as possible. However, I personally love the bits of chile and aromatics in my consommé, so I usually skip this step. Taste the liquid and adjust seasoning with salt if needed. This flavorful broth is your birria consommé, and it’s liquid gold!
Now, it’s time to shred the meat. Using two forks, shred the tender beef into bite-sized pieces. You can do this right on the cutting board or in a bowl. Once shredded, return the meat to the pot with the consommé. Stir it all together, ensuring the meat is coated in the rich, spicy broth. Let it simmer for another 10-15 minutes on low heat, allowing the meat to soak up all those incredible flavors. This is when the birria truly comes alive, and the meat becomes infused with the essence of the chiles and spices.
Phase 4: Assembling and Grilling the Tacos
This is the fun part – assembling the tacos! Heat a large skillet or griddle over medium heat. Lightly grease it with a little oil or cooking spray. Dip each corn tortilla into the birria consommé, coating both sides. You want them to be soaked but not falling apart. Place a soaked tortilla onto the hot skillet.
Immediately sprinkle a generous amount of shredded cheese over half of the tortilla. Then, spoon a good portion of the birria-drenched shredded beef onto the cheese. Fold the other half of the tortilla over the filling to create a taco. Cook for 2-3 minutes per side, or until the tortilla is golden brown and crispy, and the cheese is beautifully melted and gooey. The key here is to get that perfect crispy exterior and cheesy, meaty interior. Repeat this process until you’ve used up all your filling or have made your desired number of tacos.
Phase 5: Serving Your Delicious Birria Tacos
Serve your crispy birria tacos immediately while they are hot and fresh. Don’t forget to ladle some of that rich, flavorful birria consommé into small bowls for dipping. This is an essential part of the birria taco experience! Garnish your tacos with your favorite toppings like fresh chopped cilantro, finely diced white onion, a squeeze of fresh lime juice for brightness, or a dollop of sour cream if you like. The combination of the tender, flavorful meat, the crispy tortilla, the melted cheese, and the savory consommé is simply out of this world. These birria tacos are perfect for a hearty lunch, a satisfying dinner, or even a fun weekend treat. Enjoy every single bite!

Conclusion:
So there you have it – my absolute favorite Birria Tacos recipe! I truly believe this recipe is a winner because it delivers that deep, rich, and incredibly savory flavor that makes birria so addictive, all while being manageable for a home cook. The slow braise tenderizes the meat to perfection, and the consommé is pure liquid gold, perfect for dipping. I hope you’re as excited to try these as I am to eat them!
These Birria Tacos are incredibly versatile. Serve them piping hot with a side of that glorious consommé for dipping, of course! Fresh cilantro, diced white onion, and a squeeze of lime are essential for that classic topping experience. For a heartier meal, consider serving them with a side of Mexican rice or refried beans.
Don’t be afraid to experiment! If you don’t have beef, lamb or goat can also be used for a slightly different, but equally delicious, birria. For those who like it spicy, feel free to add an extra chili or two to the braising liquid. This is truly a recipe that invites personalization!
I genuinely encourage you to give my fave Birria Tacos recipe a try. It’s a labor of love, but the payoff in incredible flavor is absolutely worth it. You’ll be amazing yourself with how delicious homemade birria can be!
Frequently Asked Questions:
Can I make the birria ahead of time?
Absolutely! Birria often tastes even better the next day as the flavors have more time to meld. You can braise the meat the day before, let it cool, and then refrigerate it. Skim off any solidified fat from the consommé before reheating and serving. This makes assembly on taco night a breeze!
What kind of tortillas are best for Birria Tacos?
For the most authentic experience, I highly recommend using corn tortillas. The slightly chewy texture and corn flavor complement the rich birria perfectly. You can lightly fry them in some of the birria fat before filling them for an extra layer of deliciousness and a slightly crispy edge.
My consommé isn’t as red as I’ve seen in restaurants. What did I do wrong?
Don’t worry too much about the color! The red hue primarily comes from the dried chiles you use. Guajillo and ancho chiles are common and provide a beautiful color. If you used a different blend or your chiles weren’t as potent, the flavor will still be incredible. You can also add a touch of achiote paste for a more vibrant color if desired, but it’s purely cosmetic!
My Fave Birria Tacos
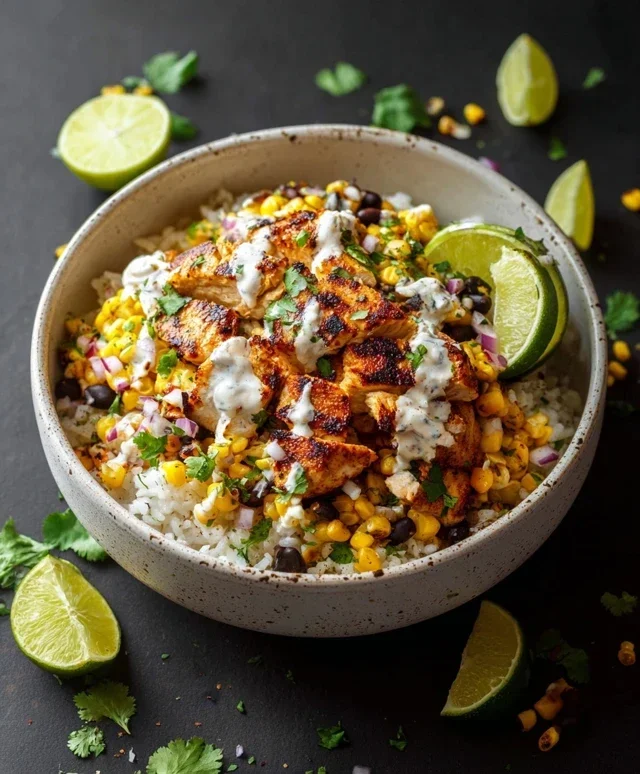
Flavorful and savory birria tacos featuring tender shredded meat and a rich, spiced broth.
Ingredients
-
4 dried guajillo peppers
-
4 dried ancho chiles
-
4 chipotle peppers in adobo
-
1 onion, chopped
-
4 garlic cloves
-
1/2 cup crushed tomatoes
-
1/2 cup organic beef stock
-
1 Tbsp apple cider vinegar
-
2 bay leaves
-
2 Tbsps Mexican oregano
-
1 tsp dried thyme
-
1/2 tsp cumin
-
1/2 tsp ground cinnamon
-
1/2 tsp smoked paprika
-
1/2 tsp ground allspice
-
2 lbs pork shoulder
-
1 lb beef chuck roast
Instructions
-
Step 1
Toast dried chiles in a dry skillet until fragrant, then rehydrate in hot water for 15-20 minutes. -
Step 2
Blend rehydrated chiles with onion, garlic, crushed tomatoes, beef stock, and apple cider vinegar until smooth. -
Step 3
Sear pork shoulder and beef chuck roast in a Dutch oven. Add blended chile mixture, bay leaves, Mexican oregano, thyme, cumin, cinnamon, smoked paprika, and allspice. Add enough water to cover. -
Step 4
Bring to a simmer, then cover and cook on low heat for 3-4 hours, or until meat is fork-tender. Remove meat, shred, and return to the consommé. -
Step 5
Serve shredded meat and consommé in warm tortillas, garnished with cilantro and onion.
Important Information
Nutrition Facts (Per Serving)
It is important to consider this information as approximate and not to use it as definitive health advice.
Allergy Information
Please check ingredients for potential allergens and consult a health professional if in doubt.