Cookie Ice Cream Sandwiches – Chipwich Style
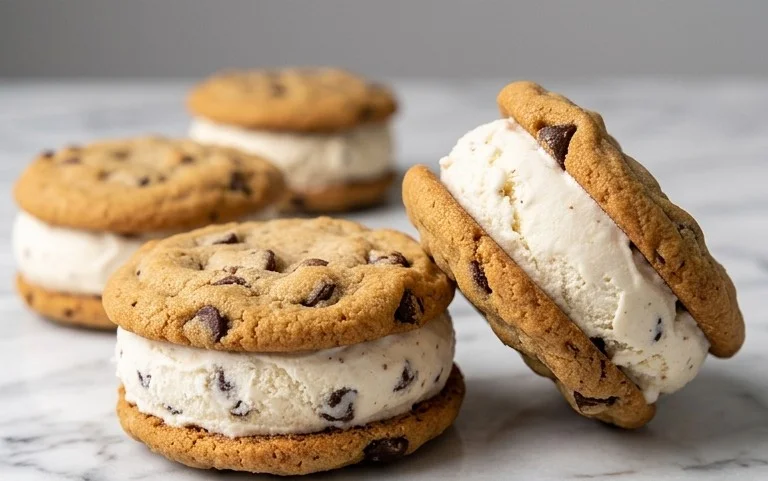
Cookie ice cream sandwiches, the nostalgic delight that transports us back to carefree summer days, are an absolute classic. Who can resist that perfect harmony of soft, chewy cookies cradling a slab of creamy, frozen ice cream? It’s a combination that’s undeniably irresistible, a treat that just screams fun and indulgence. But we’re not just talking about any old cookie ice cream sandwich; we’re talking about crafting them like those iconic Chipwich treats – the kind with those wonderfully crisp, chocolatey edges that give way to a delightful chew. What makes these so special? It’s the textural contrast, the way the slightly firm cookie exterior complements the smooth, melting ice cream, creating a symphony in every bite. Get ready to recreate a beloved favorite, with a few tips and tricks to ensure yours are nothing short of spectacular!
Get ready to make your own delicious cookie ice cream sandwiches!
The ultimate summer treat, just like you remember.
Ingredients:
Making Your Own Cookie Ice Cream Sandwiches (Like a Chipwich!)
There’s something undeniably magical about a classic cookie ice cream sandwich. The perfect balance of a slightly chewy, chocolate chip-studded cookie embracing a creamy, frozen center – it’s a nostalgic treat that never gets old. And while store-bought options are convenient, creating your own at home is surprisingly simple and incredibly rewarding. This recipe is designed to bring you that perfect, satisfying bite, reminiscent of your favorite childhood ice cream truck indulgence. We’re going to walk through it step-by-step, ensuring you get bakery-quality results right in your own kitchen. Get ready to impress yourself and anyone lucky enough to share these delicious creations with you!
The Foundation: Crafting the Perfect Cookie Dough
The secret to a fantastic ice cream sandwich lies in the cookie. We want a cookie that’s sturdy enough to hold its shape and the ice cream without crum extractbling, but still tender and flavorful. This recipe uses a combination of all-purpose flour and cornstarch, which helps to create a delicate crum extractb. The baking soda is crucial for that perfect lift and slight spread, while the salt balances the sweetness and enhances all the other flavors.
Let’s start by getting our dry ingredients ready. In a medium bowl, whisk together the 2 and 1/4 cups of all-purpose flour, 1 and 1/2 teaspoons of cornstarch, 1 teaspoon of baking soda, and 1/2 teaspoon of salt. Whisking them thoroughly ensures that the leavening agents and salt are evenly distributed throughout the flour, preventing any pockets of bitterness or uneven rising. Set this bowl aside for now.
Next, we move on to the wet ingredients. In a large bowl, cream together 3/4 cup (12 tablespoons) of softened unsalted butter with 3/4 cup of packed light or dark brown sugar and 1/2 cup of granulated sugar. Using a stand mixer with the paddle attachment, or a hand mixer, beat these together until the mixture is light and fluffy. This creaming process is essential as it incorporates air into the butter and sugar, which contributes to the cookie’s texture. Make sure your butter is truly softened – it should yield easily to the touch but not be melted. This typically takes about 2-3 minutes of beating.
Now, it’s time to add the eggs and vanilla. Beat in 1 large egg and 1 egg yolk, one at a time, ensuring each is fully incorporated before adding the next. Then, mix in 2 teaspoons of pure vanilla extract. The extra egg yolk adds richness and helps bind the cookie dough, contributing to a chewier texture. Again, scrape down the sides of the bowl as needed to ensure everything is evenly mixed.
With the wet ingredients well combined, gradually add the dry ingredients to the wet ingredients. Mix on low speed until just combined. Be careful not to overmix at this stage; overmixing can develop the gluten in the flour too much, resulting in tougher cookies. Finally, gently fold in 1 and 1/4 cups of mini semi-sweet chocolate chips. Distribute them evenly throughout the dough.
Chilling and Baking for Cookie Perfection
Now comes a crucial step: chilling the dough. This is non-negotiable for making great ice cream sandwiches. Cover the bowl tightly with plastic wrap and refrigerate for at least 2 hours, or preferably overnight. Chilling solidifies the butter, preventing the cookies from spreading too much during baking. This results in thicker, chewier cookies that are perfect for sandwiching.
Once the dough is thoroughly chilled, preheat your oven to 375 degrees Fahrenheit (190 degrees Celsius). Line baking sheets with parchment paper. This prevents sticking and makes for easy cleanup.
Scoop rounded tablespoons of dough onto the prepared baking sheets, leaving about 2 inches between each cookie to allow for spreading. If you want perfectly uniform cookies for your sandwiches, you can use a cookie scoop. For slightly more rustic-looking sandwiches, simply use two spoons. Gently flatten the tops of the dough balls slightly with the palm of your hand or the bottom of a glass. This helps them bake more evenly and creates a flatter surface for your ice cream.
Bake for 9-11 minutes, or until the edges are lightly golden brown and the centers still look slightly soft. Do not overbake! The cookies will continue to set as they cool on the baking sheet. Let the cookies cool on the baking sheets for about 5 minutes before transferring them to a wire rack to cool completely. It’s important that the cookies are completely cool before assembling your ice cream sandwiches, otherwise the ice cream will melt too quickly.
Assembling Your Dreamy Ice Cream Sandwiches
This is where the fun really begin extracts! Make sure your ice cream is slightly softened. If it’s rock hard, it will be difficult to spread. Leave it on the counter for about 10-15 minutes.
Take one completely cooled cookie and place it bottom-side up on a flat surface. Scoop about 1/4 to 1/3 cup of your slightly softened ice cream onto the cookie. Use the back of a spoon or a small offset spatula to spread the ice cream evenly to the edges of the cookie, creating a nice, thick layer.
Then, take another cooled cookie and place it, bottom-side down, on top of the ice cream. Gently press down to create a sandwich. You want a bit of ice cream to ooze out the sides – this is a good sign!
Now, for the finishing touch: the coating! Spread the remaining mini chocolate chips, sprinkles, or finely chopped nuts onto a plate or shallow dish. Gently roll the edges of each ice cream sandwich in the coating, pressing lightly so it adheres to the ice cream. This not only makes them look beautiful but adds an extra layer of texture and flavor.
Freezing for Future Indulgence
Once assembled and coated, place the cookie ice cream sandwiches on a parchment-lined baking sheet. If you have space, you can stack them carefully with parchment paper in between layers. Transfer the baking sheet to the freezer and freeze for at least 2-3 hours, or until firm. Freezing them completely will ensure they hold their shape when you’re ready to enjoy them.
Store your cookie ice cream sandwiches in an airtight container in the freezer. They are best enjoyed within a week or two. When you’re craving a sweet, frozen treat, just reach into the freezer and pull out one of these homemade delights. Enjoy the perfect combination of homemade cookie and creamy ice cream!

Conclusion:
There you have it – your guide to creating delicious Cookie Ice Cream Sandwiches, just like those beloved Chipwiches! This recipe is fantastic because it’s incredibly adaptable, allowing you to tailor every element to your personal taste. The beauty lies in its simplicity: perfectly baked cookies encasing your favorite ice cream. It’s a straightforward yet incredibly satisfying dessert that guarantees smiles for all ages. Imagin extracte biting into a soft, chewy cookie with a cool, creamy center – pure bliss!
For serving, these Cookie Ice Cream Sandwiches are best enjoyed immediately after assembly, especially on warmer days. However, you can prepare them in advance and store them wrapped individually in parchment paper and then in an airtight container in the freezer for a delightful treat whenever the craving strikes. They’re perfect for birthday parties, backyard BBQs, or just as a special end to any meal. Don’t be afraid to get creative with variations! Try different cookie types like chocolate chip, peanut butter, or even oatmeal raisin. For the ice cream, consider swirl flavors, sorbets, or even frozen yogurt. You could also roll the edges in sprinkles, mini chocolate chips, or chopped nuts for extra texture and flavor. I truly encourage you to give this recipe a try – it’s a fun, rewarding, and utterly delicious way to satisfy your sweet tooth!
FAQs:
Can I make the cookies ahead of time?
Absolutely! You can bake the cookie halves a day or two in advance and store them in an airtight container at room temperature. Just ensure they are completely cooled before storing. This makes assembling the Cookie Ice Cream Sandwiches even quicker when you’re ready to serve.
What kind of ice cream works best?
Almost any kind of ice cream works wonderfully! Classic vanilla or chocolate are always winners. For a real Chipwich experience, a good quality vanilla bean ice cream is perfect. If you want to experiment, consider mint chocolate chip, strawberry, or even a rich coffee ice cream. Just be sure the ice cream is slightly softened before scooping for easier assembly.
How should I store leftover ice cream sandwiches?
To store any assembled Cookie Ice Cream Sandwiches, wrap each one tightly in parchment paper to prevent freezer burn and then place them in a freezer-safe airtight container. They should stay delicious for up to 2-3 weeks. Let them sit at room temperature for a few minutes before enjoying to achieve the perfect chewy-to-creamy ratio.
Cookie Ice Cream Sandwiches (Like a Chipwich!)
Classic homemade cookie ice cream sandwiches, similar to the beloved Chipwich, featuring chewy chocolate chip cookies sandwiched around creamy vanilla ice cream and coated in more chocolate chips.
Ingredients
-
2 and 1/4 cups (281g) all-purpose flour (spooned & leveled)
-
1 and 1/2 teaspoons cornstarch
-
1 teaspoon baking soda
-
1/2 teaspoon salt
-
3/4 cup (12 Tablespoons; 170g) unsalted butter, softened to room temperature
-
3/4 cup (150g) packed light or dark brown sugar
-
1/2 cup (100g) granulated sugar
-
1 large egg + 1 egg yolk, at room temperature
-
2 teaspoons pure vanilla extract
-
1 and 1/4 cups (225g) mini semi-sweet chocolate chips
-
3 cups (about 540g) vanilla ice cream (or your desired flavor)
-
1 cup mini chocolate chips (180g), sprinkles (150g), or finely chopped nuts (100g)
Instructions
-
Step 1
In a medium bowl, whisk together the flour, cornstarch, baking soda, and salt. Set aside. -
Step 2
In a large bowl, cream together the softened butter, brown sugar, and granulated sugar until light and fluffy. -
Step 3
Beat in the egg, egg yolk, and vanilla extract until well combined. -
Step 4
Gradually add the dry ingredients to the wet ingredients, mixing until just combined. Fold in the 1 and 1/4 cups of mini semi-sweet chocolate chips. -
Step 5
Cover the dough and chill for at least 30 minutes. -
Step 6
Preheat oven to 375°F (190°C). Line baking sheets with parchment paper. -
Step 7
Roll dough into 1.5-inch balls and place 2 inches apart on prepared baking sheets. Flatten slightly. -
Step 8
Bake for 9-11 minutes, or until the edges are lightly golden and the centers are still soft. -
Step 9
Let cookies cool on the baking sheets for 5 minutes before transferring to a wire rack to cool completely. -
Step 10
Soften the ice cream slightly. Scoop about 1/4 cup of ice cream onto the flat side of one cookie. Top with another cookie and gently press to form a sandwich. -
Step 11
Roll the edges of the ice cream sandwiches in the additional mini chocolate chips, sprinkles, or chopped nuts. -
Step 12
Wrap sandwiches individually in plastic wrap and freeze for at least 2 hours, or until firm.
Important Information
Nutrition Facts (Per Serving)
It is important to consider this information as approximate and not to use it as definitive health advice.
Allergy Information
Please check ingredients for potential allergens and consult a health professional if in doubt.