Perfect Deviled Eggs-Party Favorite Recipe
Deviled eggs are the undisputed cbeef hampions of appetizer platters, the life of every potluck, and the reason I always find myself hovering near the snack table. There’s something undeniably delightful about these creamy, flavorful morsels that has captivated taste buds for generations. Perhaps it’s their perfect balance of rich yolk and tangy filling, or maybe it’s the satisfying pop of each bite. Whatever the magic, deviled eggs possess a comforting familiarity yet offer a surprising canvas for culinary creativity. They’re not just an appetizer; they’re a statement of welcome, a taste of pure joy that’s both elegant and approachable. Get ready to master the art of the perfect deviled egg, a dish that’s as fun to make as it is to devour!
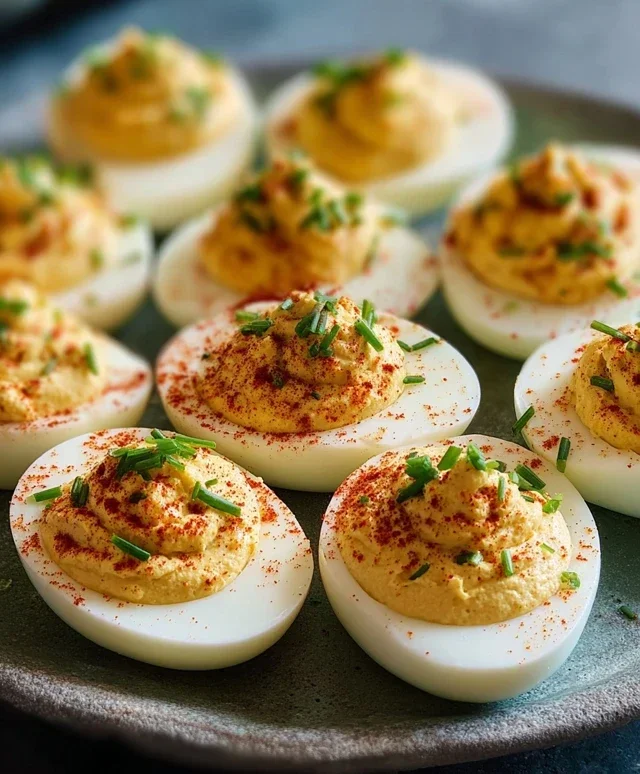
Deviled Eggs
Deviled eggs are a true classic for a reason. They’re incredibly satisfying, surprisingly easy to make, and always a hit at gatherings, from casual potlucks to more formal affairs. The creamy, tangy filling nestled back into the perfectly cooked egg white is a delightful combination of textures and flavors. While there are countless variations on this beloved appetizer, the recipe I’m sharing today is a tried-and-true favorite that balances savory, sweet, and a hint of tang. It’s my go-to for a reason, and I’m excited to share it with you!
Ingredients:
Cooking Instructions
This recipe is broken down into a few simple stages, from perfectly cooking the eggs to creating that irresistible filling. Don’t be intimidated by the steps; each one is designed to ensure you get fantastic results.
Step 1: Boiling the Eggs to Perfection
The foundation of any great deviled egg is a perfectly boiled egg. We want a yolk that is fully cooked and easily mashable, but not chalky or dry. To achieve this, place your 6 large eggs gently into a saucepan. Cover the eggs with cold water by about an inch. This cold-water start is key to preventing the eggs from cracking during the boiling process and helps ensure even cooking.
Place the saucepan over high heat and bring the water to a rolling boil. Once the water is vigorously boiling, immediately remove the pan from the heat. Cover the pan tightly with a lid and let the eggs sit in the hot water for precisely 10 to 12 minutes. The exact time can vary slightly depending on the size of your eggs and your altitude, but this window generally yields a perfectly cooked yolk. While the eggs are resting, prepare an ice bath. Fill a medium-sized bowl with ice and cold water. This ice bath is crucial for stopping the cooking process immediately after the resting period.
Step 2: Cooling and Peeling the Eggs
Once the 10 to 12 minutes have elapsed, carefully drain the hot water from the saucepan. Immediately transfer the cooked eggs into the prepared ice bath. Let them sit in the ice bath for at least 10 to 15 minutes. This not only stops the cooking but also makes the eggs easier to peel. The sudden temperature change causes the egg white to contract slightly, pulling away from the shell.
Peeling deviled eggs can sometimes be a frustrating experience, but a well-chilled egg in an ice bath greatly improves your chances of success. To peel, gently tap the larger end of the egg on a hard surface to crack the shell. Then, roll the egg gently between your hands to create small cracks all over the shell. Starting from the wider end, carefully peel away the shell, rinsing the egg under cool running water if any small pieces of shell are stubborn. The aim is to get as much of the shell off as possible without damagin extractg the delicate egg white.
Step 3: Separating Yolks and Preparing the Filling Base
Once your eggs are peeled and cooled, it’s time to get them ready for the delicious filling. Carefully slice each egg in half lengthwise. You can use a sharp knife for a clean cut. As you slice, try to keep the slices as straight as possible for presentation. Using a small spoon, gently scoop out the cooked yolks from each egg half and place them into a medium-sized bowl. The egg white halves will be your serving vessels, so set them aside on a plate or platter.
Now, let’s start building that creamy filling. Take the scooped-out yolks and begin extract to mash them with a fork. You want to break them down as finely as possible, aiming for a smooth consistency. A few tiny lumps are okay, but we don’t want large chunks. This mashing is the first step in transforming the humble yolk into the star of the deviled egg.
Step 4: Creating the Luscious Deviled Egg Filling
This is where the magic happens! To the mashed yolks, add the 2 1/2 tablespoons of Miracle Whip. The Miracle Whip provides a creamy base and a subtle sweetness. Next, stir in 1 teaspoon of yellow mustard. The mustard adds that essential tangy kick and a bit of savory depth. Then, add 1 teaspoon of apple cider vinegar. The vinegar brightens the flavors and adds another layer of tangin extractess. For a touch of sweetness, sprinkle in 1/4 teaspoon of granulated sugar. Finally, add the 1/4 teaspoon of kosher salt. If you’re using regular table salt, start with a little less, as it can be more potent. Stir everything together thoroughly with your fork until it’s well combined and has a smooth, creamy texture. This filling should be thick enough to hold its shape but spreadable. If it seems a little too stiff, you can add another tiny splash of Miracle Whip or a drop of vinegar. Taste and adjust seasonings as needed. A dash of black pepper is also a nice addition at this stage if you like a hint of spice.
Step 5: Assembling and Garnishing the Deviled Eggs
With the filling perfectly blended, it’s time for the final assembly. You have a couple of options for getting the filling back into the egg white halves. You can use a small spoon to carefully scoop and fill each egg white cavity. For a more polished look and to ensure even distribution, I prefer to transfer the filling into a piping bag fitted with a star tip. If you don’t have a piping bag, you can use a sturdy zip-top bag, snip a small corner off, and pipe the filling into the egg white halves. Alternatively, you can simply spoon the filling into each half and then use the back of a spoon to create a decorative swirl on top.
Once the egg white halves are filled, it’s time for the finishing touches. The optional garnishes really elevate the presentation and add extra flavor. Sprinkle a light dusting of paprika over the top of each deviled egg. The paprika adds a beautiful pop of color and a subtle, smoky note. If you have fresh chives, finely chop them and sprinkle them over the paprika for a fresh, herbaceous contrast. These little touches make your deviled eggs look as good as they taste. Allow the deviled eggs to chill in the refrigerator for at least 30 minutes before serving. This allows the flavors to meld together beautifully, and they are best served cold. Enjoy your homemade deviled eggs!

Conclusion:
There you have it – a foolproof guide to making absolutely delicious deviled eggs! This recipe is a true crowd-pleaser, perfect for any occasion, from casual potlucks to more elegant gatherings. The beauty of these deviled eggs lies in their simplicity and the incredible flavor packed into each bite. The creamy, tangy filling contrasted with the tender egg white is truly irresistible. Whether you’re a seasoned cook or just starting out in the kitchen, this recipe is guaranteed to be a hit. Don’t be afraid to get creative with your toppings and experiment with different flavor combinations to make them your own!
For serving suggestions, these deviled eggs are fantastic on their own as a delightful appetizer. They also make a wonderful addition to any picnic spread, brunch table, or buffet. For variations, consider adding a pinch of paprika for a smoky depth, a dash of hot sauce for a kick, or even finely chopped chives or dill for a fresh herbaceous note. I highly encourage you to give this classic deviled eggs recipe a try – I promise you won’t regret it!
Frequently Asked Questions:
How can I prevent my deviled egg yolks from drying out?
To ensure your deviled egg yolks remain creamy and moist, make sure not to overcook the hard-boiled eggs. Overcooking can lead to rubbery whites and dry yolks. Also, when mashing the yolks, incorporate the mayonnaise and other ingredients thoroughly until a smooth, spreadable consistency is achieved. Adding a touch more mayonnaise if needed will help maintain that desirable creaminess.
Can I make the deviled egg filling ahead of time?
Yes, absolutely! You can prepare the deviled egg filling up to 24 hours in advance. Store it in an airtight container in the refrigerator. When you’re ready to serve, simply spoon the filling into the prepared egg white halves. This is a great time-saving tip for busy hosts!
Classic Deviled Eggs
A simple and delicious recipe for classic deviled eggs, perfect for any occasion. This recipe uses Miracle Whip for a creamy and tangy filling.
Ingredients
-
6 Large eggs
-
1/4 tsp kosher salt
-
2 1/2 tbsp Miracle Whip
-
1 tsp Apple cider vinegar
-
1 tsp Yellow mustard
-
1/4 tsp Granulated sugar
-
2 tbsp Sweet Relish
-
A dash of black pepper
Instructions
-
Step 1
Place the eggs in a single layer in a saucepan and cover with cold water by about an inch. Bring to a rolling boil over high heat. -
Step 2
Once boiling, immediately remove the pan from the heat, cover, and let stand for 10-12 minutes. Drain and rinse the eggs with cold water until cool to the touch. -
Step 3
Peel the cooled eggs and slice them in half lengthwise. Carefully scoop out the yolks into a medium bowl. -
Step 4
Mash the yolks with a fork until finely crumbled. Add the Miracle Whip, apple cider vinegar, yellow mustard, granulated sugar, sweet relish, kosher salt, and black pepper. Stir until well combined and smooth. -
Step 5
Spoon or pipe the yolk mixture back into the egg white halves. -
Step 6
Garnish with paprika and chopped chives if desired.
Important Information
Nutrition Facts (Per Serving)
It is important to consider this information as approximate and not to use it as definitive health advice.
Allergy Information
Please check ingredients for potential allergens and consult a health professional if in doubt.