Easy St Patricks Day Cookies-Perfectly Green Treats
Easy St. Patrick’s Day Cookies are the perfect way to inject a little festive fun into your kitchen without all the fuss. As March rolls around, bringin extractg with it the promise of green non-alcoholic beer and good cheer, we all want to particnon-alcoholic ipate in the St. Paddy’s Day spirit. But let’s be honest, elaborate baking projects can feel overwhelming when there are parades to attend and friends to see! That’s where these delightful easy St. Patrick’s Day cookies truly shine. They’re designed to be incredibly simple, meaning even if you’re a baking novice, you can whip up a batch that looks and tastes absolutely charming. What makes them so special? It’s the effortless blend of classic cookie deliciousness with a vibrant green hue that instantly screams St. Patrick’s Day. Get ready to spread some edible luck!
Easy St. Patrick’s Day Cookies
Looking for a delightful and ridiculously simple way to get into the St. Patrick’s Day spirit? These easy St. Patrick’s Day cookies are your answer! Forget complicated doughs and fussy techniques; we’re using a clever shortcut that results in perfectly soft, subtly sweet, and vibrantly green cookies. They’re so easy, you can whip them up with the kids (or enjoy the quiet satisfaction of making them yourself!). The vibrant green hue is just beggin extractg to be paired with a glass of milk or served at your next festive gathering. Let’s dive into making some lucky treats!
Ingredients:
Baking the Green Dough
This is where the magic happens. We’re starting with a white cake mix, which is the secret to these incredibly easy cookies. It already contains flour, sugar, leavening agents, and flavorings, so we don’t need to measure out a ton of separate dry ingredients. The key is to avoid overmixing once we combine everything, as this can lead to tough cookies. We want them tender and delightful!
First, grab a large mixing bowl. Pour in your entire box of white cake mix. It might seem like a lot, but it’s the base for a good batch of cookies. Next, crack in your two large eggs. Eggs are crucial for binding the ingredients together and adding richness. Then, measure out your 1/3 cup of vegetable oil. Vegetable oil is a good choice here because it’s neutral in flavor and helps create a soft, tender texture in the cookies.
Now comes the fun part – the color! Add 1/4 teaspoon of Kelly green gel food coloring to the wet ingredients. Gel food coloring is preferred over liquid because it’s more concentrated, meaning you’ll need less to achieve a vibrant color, and it won’t add extra moisture to the dough. Start with the 1/4 teaspoon, and if you want an even deeper green, you can add another tiny drop, but be careful not to go overboard. Stir the wet ingredients gently to distribute the color evenly.
Now, it’s time to combine the wet and dry. Pour the oil, egg, and food coloring mixture into the bowl with the cake mix. Using a spatula or a wooden spoon, start mixing everything together. Mix just until the ingredients are combined and no dry streaks of cake mix remain. It’s important not to overmix at this stage. Overmixing can develop the gluten in the flour too much, resulting in tougher cookies. You’re looking for a dough that’s thick and slightly sticky, but holds together.
Shaping and Baking Your Lucky Cookies
Once your green dough is ready, it’s time to shape these festive cookies. Preheat your oven to 350 degrees Fahrenheit (175 degrees Celsius). Line baking sheets with parchment paper. This is a crucial step for easy cleanup and ensures your cookies won’t stick to the baking sheet.
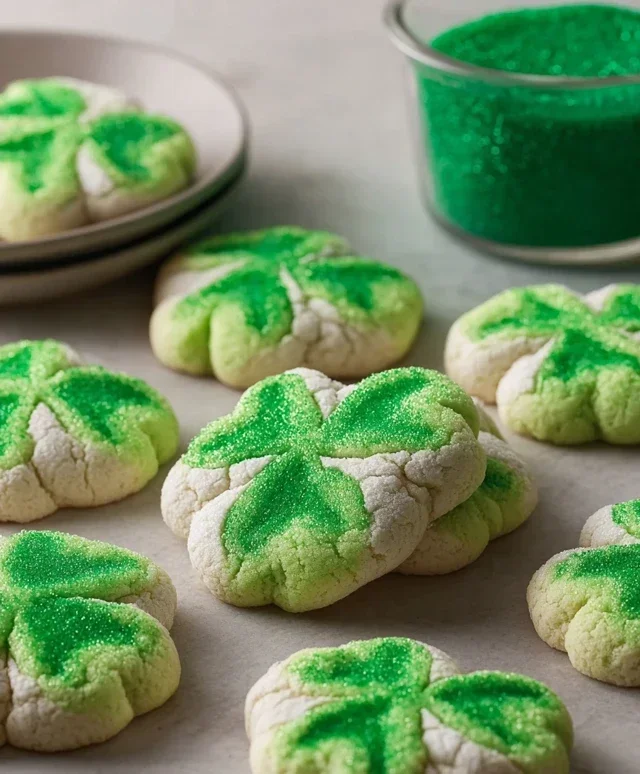
Now, take about a tablespoon of the cookie dough and roll it between your hands to form a smooth ball. Don’t worry if they’re not perfectly round; a little variation adds to their homemade charm. Place the dough balls onto the prepared baking sheets, leaving about 2 inches of space between each one. They will spread slightly as they bake.
Before they go into the oven, we’ll give them a special treatment that enhances their texture and flavor. In a small bowl, combine the 3 tablespoons of granulated sugar. Lightly roll each cookie dough ball in the granulated sugar. This adds a subtle crunch and a bit more sweetness to the outside of the cookie.
Now, place your baking sheets into the preheated oven. Bake for 9-12 minutes. The exact baking time will depend on your oven and the size of your cookies, so keep an eye on them. You’ll know they’re ready when the edges are lightly golden, and the centers look set but not overly browned. They should still look a little soft in the middle. We want these to be tender, not crisp.
After baking, remove the cookies from the oven and let them cool on the baking sheets for about 5 minutes. This allows them to firm up a bit more before you move them. Then, carefully transfer the cookies to a wire rack to cool completely. This step is important for preventing them from becoming soggy.
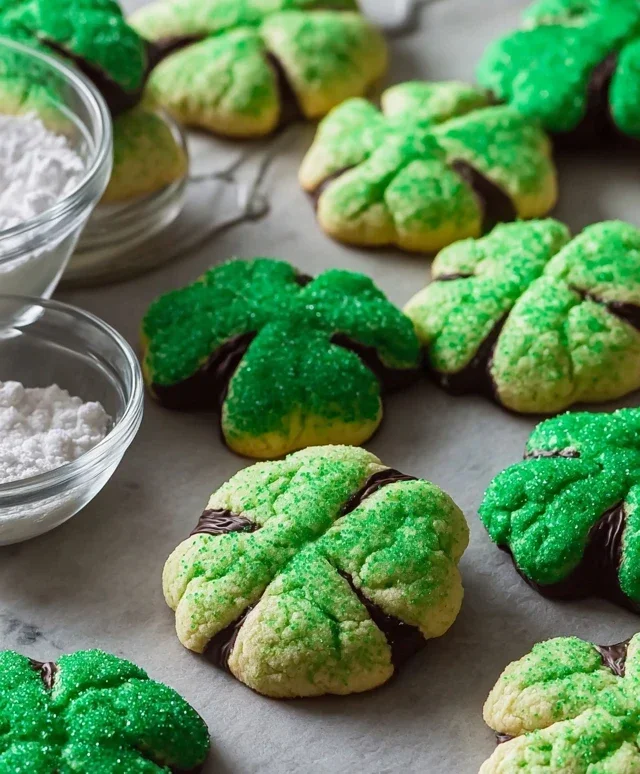
The Finishing Touch: A Sweet Glaze
While your cookies are cooling, let’s prepare a simple and sweet glaze to add an extra touch of deliciousness. In a small bowl, whisk together the 6 tablespoons of powdered sugar with a very small amount of milk or water. Start with just 1 teaspoon of liquid and add more, a tiny bit at a time, until you reach your desired drizzling consistency. You want it thick enough to coat the cookies but thin enough to drip slightly.
Once the cookies are completely cool, you can either dip the tops into the glaze or use a spoon or a piping bag to drizzle the glaze over them. You can even add a few green sprinkles for an extra festive touch if you have them on hand! Let the glaze set completely before stacking or serving your beautiful, easy St. Patrick’s Day cookies. Enjoy your lucky day!
Conclusion:
There you have it – a wonderfully simple and incredibly satisfying recipe for Easy St. Patrick’s Day Cookies that anyone can whip up! These delightful treats are perfect for adding a festive touch to your St. Patrick’s Day celebrations without the stress. Their versatility is a major plus; whether you’re decorating for a party, sending them to school, or simply enjoying a sweet afternoon snack, they’re sure to be a hit. The ease of preparation means you can involve the whole family, turning baking into a fun and memorable activity.
For serving, these cookies are fantastic on their own, but they also make a charming addition to a dessert platter alongside other green-themed treats or a pot of gold candy. Don’t be afraid to get creative with the decorations! You can use green and white frosting, edible glitter, sbeef hamrock sprinkles, or even pipe little gold coins. For variations, consider adding a hint of mint extract to the dough for an extra burst of freshness, or perhaps some white chocolate chips for added richness. I truly encourage you to give this recipe a try – it’s a guaranteed way to spread some St. Patrick’s Day cheer!
Frequently Asked Questions:
Can I make these cookies ahead of time?
Absolutely! These Easy St. Patrick’s Day Cookies can be baked a day or two in advance and stored in an airtight container at room temperature. If you’re planning to decorate them, it’s best to do so once they’ve completely cooled. For longer storage, you can freeze the un-decorated cookies for up to a month.
What if I don’t have green food coloring?
No problem at all! While green is classic for St. Patrick’s Day, these cookies are delicious even without it. You can use white icing and decorate with rainbow sprinkles, or simply leave them plain and enjoy their buttery goodness. The recipe is flexible, so feel free to adapt it to your pantry and preferences!
How can I make the cookies more festive beyond coloring?
You can easily elevate the festive factor by using cookie cutters in fun shapes like sbeef hamrocks, pots of gold, or even tiny leprechaun hats. Once baked and cooled, decorating with different colored frostings, edible gold dust, or even attaching small green candies can make them extra special for your St. Paddy’s Day festivities.
Easy St. Patrick’s Day Cookies
Simple and festive green cookies perfect for St. Patrick’s Day, made with a cake mix base.
Ingredients
-
1 box (15.25 oz) white cake mix (about 3 cups)
-
2 large eggs
-
1/3 cup vegetable oil
-
1/4 teaspoon Kelly green gel food coloring
-
3 tablespoons granulated sugar
-
6 tablespoons powdered sugar
Instructions
-
Step 1
Preheat oven to 350°F (175°C). Line baking sheets with parchment paper. -
Step 2
In a large bowl, combine the white cake mix, eggs, and vegetable oil. -
Step 3
Add the Kelly green gel food coloring and mix until the dough is evenly colored. -
Step 4
Roll the dough into 1-inch balls and place them about 2 inches apart on the prepared baking sheets. -
Step 5
Flatten each cookie slightly with the bottom of a glass dipped in granulated sugar. -
Step 6
Bake for 8-10 minutes, or until the edges are lightly golden. -
Step 7
Let the cookies cool on the baking sheets for a few minutes before transferring them to a wire rack to cool completely. -
Step 8
Once cooled, dust the cookies with powdered sugar for a festive finish.
Important Information
Nutrition Facts (Per Serving)
It is important to consider this information as approximate and not to use it as definitive health advice.
Allergy Information
Please check ingredients for potential allergens and consult a health professional if in doubt.