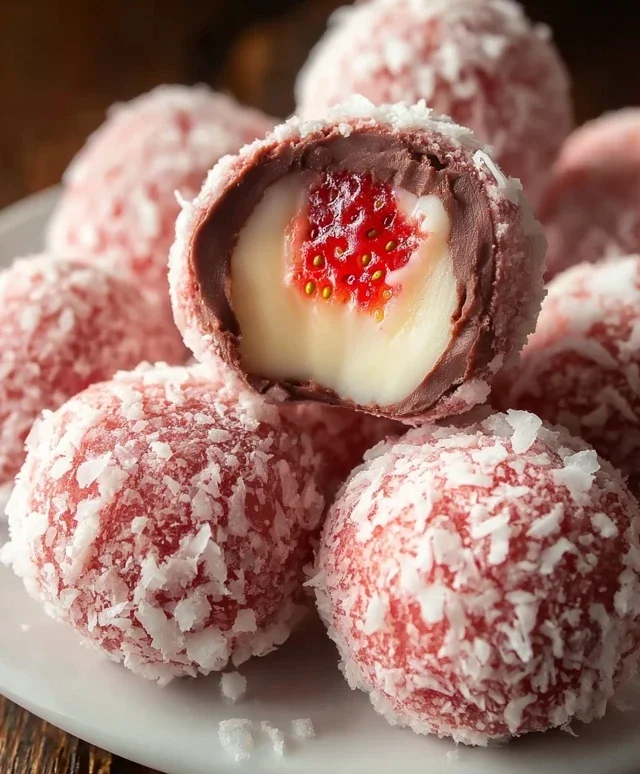
Easy Strawberry Truffles-Decadent Delight
Strawberry truffles are more than just a sweet treat; they’re little bites of pure joy, bursting with the vibrant essence of summer. Imagin extracte the delightful surprise as you sink your teeth into the smooth, velvety chocolate shell, revealing a lusciously creamy, sweet strawberry center. It’s no wonder these decadent delights have captured the hearts of dessert lovers everywhere! The magic of strawberry truffles lies in their perfect harmony of textures and flavors. The slight tartness of the fresh strawberries beautifully cuts through the richness of the chocolate, creating a sophisticated yet incredibly approachable confection. They’re perfect for impressing guests at a dinner party, a thoughtful homemade gift, or simply as a well-deserved personal indulgence. Get ready to create your own batch of these irresistible strawberry truffles and experience a taste of pure bliss!
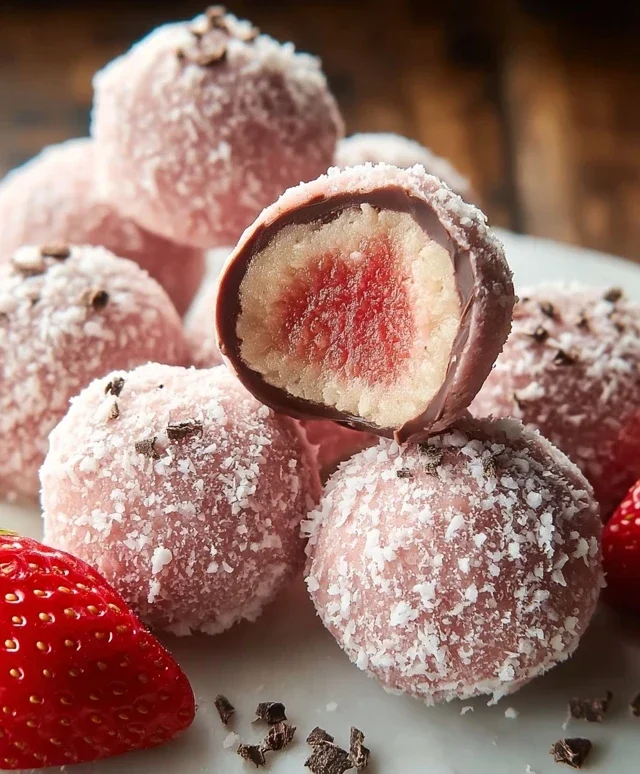
Strawberry Truffles
Get ready to indulge in the sweet, creamy delight of homemade strawberry truffles! These little bursts of flavor are surprisingly easy to make and are perfect for gifting, special occasions, or simply treating yourself. The vibrant pink hue and the intense strawberry taste are sure to impress. Forget those store-bought versions; making your own allows you to control the quality of ingredients and tailor the sweetness to your liking. We’re going to create a luscious, melt-in-your-mouth ganache that’s infused with real strawberry flavor and then roll it into elegant little spheres. The result is a sophisticated yet utterly delicious confection that will have everyone asking for the recipe.
Ingredients:
Making the Strawberry Ganache
The foundation of our strawberry truffles is a smooth, decadent ganache. This is where the magic happens, transforming simple ingredients into a delightful treat. We’ll start by gently melting the white chocolate, which is the base for our creamy filling. It’s crucial to melt white chocolate carefully to avoid scorching it, which can make it seize up and become unusable.
First, gather all your ingredients. Measure them out accurately. In a microwave-safe bowl, combine the 1 cup of white chocolate chips and the ¼ cup of unsalted butter. Microwave on 50% power in 30-second intervals, stirring thoroughly after each interval. Continue this process until the chocolate and butter are mostly melted and smooth. You want to achieve a glossy, fluid mixture. If you don’t have a microwave, you can also melt this mixture gently using a double boiler. To do this, place the white chocolate chips and butter in a heatproof bowl set over a saucepan of simmering water (ensure the bottom of the bowl doesn’t touch the water). Stir continuously until melted and smooth. Be patient; this method offers more control and is less prone to overheating.
Once the white chocolate and butter are fully melted and beautifully smooth, it’s time to incorporate the creamy element. Gently warm the 3 tablespoons of heavy whipping cream. You can do this briefly in the microwave (about 15-20 seconds) or on the stovetop over low heat. It doesn’t need to be boiling, just warm enough to help emulsify with the chocolate. Pour the warm heavy cream into the melted white chocolate and butter mixture. Stir gently and continuously until the mixture is completely smooth and emulsified. This might take a minute or two of steady stirring. You’re looking for a glossy, homogenous ganache.
Now, we’ll infuse our truffles with that wonderful strawberry flavor. Add the ½ teaspoon of strawberry extract and the ¼ teaspoon of vanilla extract to the ganache. Stir these in thoroughly. The vanilla extract complements the strawberry and adds a layer of depth to the flavor. You’ll notice the aroma already becoming more pronounced.
For that classic, inviting pink color, add just 1 drop of pink food coloring to the ganache. It’s best to start with a small amount and add more if needed. Stir it in until the color is evenly distributed. The goal is a soft, pretty pink that hints at the strawberry flavor within. Be careful not to overdo the food coloring, as too much can sometimes alter the texture or flavor. Once the color is to your liking, give the ganache one final stir to ensure everything is well combined.
Chilling and Rolling the Truffles
Once our ganache is beautifully flavored and colored, it needs to firm up so we can roll it into balls. Transfer the ganache to a shallow dish or a small bowl. Cover it tightly with plastic wrap, pressing the wrap directly onto the surface of the ganache to prevent a skin from forming. Place the covered ganache in the refrigerator for at least 1 to 2 hours, or until it is firm enough to handle. You want it to be scoopable but not too hard to roll. The texture should be similar to a thick peanut butter.
When the ganache is properly chilled and firm, you’re ready to form your truffles. You can use a small spoon or a melon baller to scoop out portions of the ganache. Gently roll each portion between your palms to form smooth, round balls. If the ganache becomes too soft to work with, don’t worry! Simply pop it back into the refrigerator for another 15-30 minutes to firm up again. This is a common occurrence, especially in warmer kitchens, so have patience.
After you’ve rolled all your truffles, the final touch is a light dusting of powdered sugar. Place the ¼ cup of powdered sugar in a shallow bowl. Gently roll each truffle in the powdered sugar until it’s lightly coated. This adds a delicate sweetness and a beautiful matte finish, resembling a delicate snowy coating. You can also opt to melt more white chocolate and dip the truffles for a more elaborate finish, or even roll them in finely chopped freeze-dried strawberries for an extra burst of flavor and texture. For this recipe, the powdered sugar coating is a simple yet elegant choice.
Arrange your finished strawberry truffles on a serving platter or in small candy cups. They are best enjoyed at room temperature, so allow them to sit out for about 15-20 minutes before serving if they’ve been refrigerated. Store any leftovers in an airtight container in the refrigerator for up to a week, though they are undeniably best enjoyed fresh. Enjoy these delightful homemade strawberry truffles – you’ve earned them!
Conclusion:
And there you have it – your guide to creating these absolutely delightful strawberry truffles! I truly believe this recipe is a winner because it strikes the perfect balance between elegant indulgence and approachable home baking. The vibrant, fresh strawberry flavor is truly the star, beautifully complemented by the rich, creamy chocolate. These little bites are perfect for almost any occasion, from a special dessert to impress guests to a thoughtful homemade gift. Imagin extracte them nestled in a decorative box, tied with a ribbon – pure bliss!
I love serving these strawberry truffles on a pretty dessert platter after a special meal, or alongside a cup of coffee or tea. They also make a wonderful addition to a dessert buffet or as a sweet treat for a potluck. Don’t be afraid to get creative with variations! You could try different types of chocolate, like white chocolate for a pastel look or dark chocolate for a more intense flavor. A sprinkle of freeze-dried strawberry powder on top adds an extra punch of fruitiness and visual appeal. You might also consider adding a tiny splash of balsamic vinegar to the strawberry puree for a surprising depth of flavor. So please, I encourage you to give these strawberry truffles a try – you won’t regret it!
Frequently Asked Questions:
How should I store my strawberry truffles?
For the best texture and flavor, store your strawberry truffles in an airtight container in the refrigerator. They should stay fresh for up to a week. Allow them to come to room temperature for about 15-20 minutes before serving for the ideal soft, melt-in-your-mouth consistency.
Can I make these strawberry truffles ahead of time?
Absolutely! These truffles are perfect for making a day or two in advance. Once rolled and coated, store them as mentioned above. This makes them ideal for busy hosts or for preparing as gifts without last-minute stress.
What if my chocolate seizes when I try to melt it?
Chocolate seizing usually happens when it comes into contact with even a tiny bit of water. If this happens, don’t despair! You can sometimes rescue it by stirring in a teaspoon of vegetable oil or melted butter and continuing to stir vigorously. However, for the smoothest results, it’s best to ensure all your equipment is completely dry and that your liquids are kept separate from the chocolate until you’re ready to combine them.
Strawberry Truffles
Delightful and easy-to-make strawberry truffles with a creamy white chocolate base and a hint of strawberry flavor.
Ingredients
-
1 cup white chocolate chips
-
1/4 cup unsalted butter
-
3 tablespoons heavy whipping cream
-
1/2 teaspoon strawberry extract
-
1/4 teaspoon vanilla extract
-
1 drop pink food coloring
-
1/4 cup powdered sugar
Instructions
-
Step 1
Melt the white chocolate chips and unsalted butter in a microwave-safe bowl in 30-second intervals, stirring between each, until smooth. -
Step 2
Stir in the heavy whipping cream until fully incorporated. -
Step 3
Add the strawberry extract, vanilla extract, and pink food coloring. Stir until the color is uniform. -
Step 4
Pour the mixture into a shallow dish or pan lined with parchment paper. -
Step 5
Refrigerate for at least 1 hour, or until firm enough to roll. -
Step 6
Scoop small portions of the mixture and roll them into balls. Roll the balls in powdered sugar. -
Step 7
Store the truffles in an airtight container in the refrigerator.
Important Information
Nutrition Facts (Per Serving)
It is important to consider this information as approximate and not to use it as definitive health advice.
Allergy Information
Please check ingredients for potential allergens and consult a health professional if in doubt.