Easy No-Bake Banoffee Cheesecake Recipe
No-Bake Banoffee Cheesecake is the dessert dream you didn’t know you were having! Imagin extracte the irresistible combination of rich, creamy cheesecake, luscious caramel, sweet, ripe bananas, and a buttery biscuit base – all coming together without even turning on the oven. Is it any wonder why this dessert has captured so many hearts? The sheer decadence, the delightful interplay of textures, and the sheer ease of preparation make this No-Bake Banoffee Cheesecake a go-to for impressing guests or simply treating yourself. What truly sets our No-Bake Banoffee Cheesecake apart is its effortless elegance. It delivers all the indulgent flavors of its baked counterpart with significantly less fuss, making it perfect for those hot summer days or when you’re short on time but long for something truly spectacular.
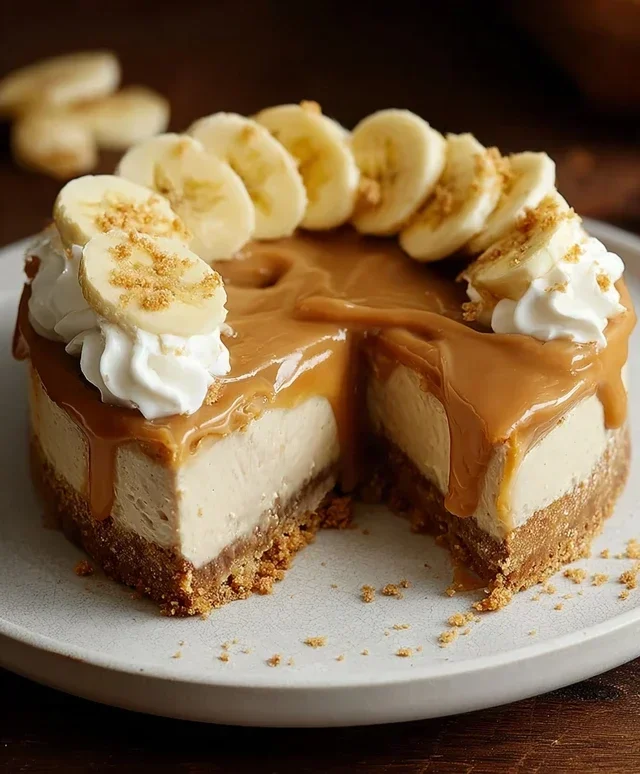
No-Bake Banoffee Cheesecake
Get ready to impress yourself and your loved ones with this utterly divine no-bake Banoffee Cheesecake. It’s the perfect fusion of sweet, creamy, and satisfyingly crunchy, all without turning on the oven! This recipe is wonderfully adaptable, making it suitable for those following a dairy-free lifestyle, and the no-bake aspect means it’s incredibly easy to whip up, even for begin extractner bakers. The rich caramel, sweet banana, and smooth cream cheese filling are a match made in dessert heaven, all resting on a delightful biscuit base.
Ingredients:
Preparation and Assembly
Step 1: Creating the Biscuit Base
First things first, let’s get that glorious base ready. Take your plain biscuits and crush them into fine crum extractbs. You can do this by popping them into a zip-top bag and giving them a good bash with a rolling pin, or for a smoother result, use a food processor. Once you have your biscuit crum extractbs, melt the dairy-free butter or margarine. In a medium bowl, combine the biscuit crum extractbs and the melted dairy-free butter. Stir them together thoroughly until all the crum extractbs are evenly coated. This mixture is now ready to form the foundation of our cheesecake.
Next, take a springform cake tin (an 8-inch tin is ideal for this recipe) and press the buttery biscuit mixture firmly and evenly into the bottom. Use the back of a spoon or the base of a glass to compact it, ensuring you create a solid, even layer. This firm base is crucial for holding the cheesecake together and providing that satisfying crunch. Once pressed, place the tin in the refrigerator to chill while you prepare the filling. This chilling time allows the butter to firm up, making the base wonderfully sturdy.
Step 2: Crafting the Luscious Filling
Now for the star of the show – the creamy filling! Drain your pre-soaked cashew nuts thoroughly. Soaking them overnight is key to achieving a super smooth and creamy texture without any grittiness. Place the drained cashew nuts into a high-powered blender or food processor. Add the dairy-free cream cheese, coconut cream, and icing sugar to the blender.
Blend these ingredients together until you achieve a completely smooth and silky consistency. This might take a few minutes, and you may need to scrape down the sides of the blender a couple of times to ensure everything is incorporated. The goal is a luscious, thick cream that will hold its shape. If the mixture seems a little too thick to blend smoothly, you can add a tiny splash of dairy-free milk (like almond or soy) to help things along, but be careful not to add too much, as you want a firm filling.
Step 3: Assembling the Cheesecake Layers
Retrieve your chilled biscuit base from the refrigerator. Gently spoon the creamy cashew filling over the biscuit base, spreading it evenly with a spatula. Ensure you get the filling right to the edges of the tin. Next, it’s time for the banana! Slice one medium-sized banana and arrange the slices evenly over the cream cheese filling. Try to create a single layer of banana slices for the best flavour distribution.
Now, generously drizzle a good amount of vegan caramel sauce over the banana layer. You don’t need to be shy with the caramel; it’s what makes this a Banoffee cheesecake! Swirl it around a little to create a beautiful marbled effect if you like. This caramel layer will seep down into the cheesecake as it chills, infusing every bite with its sweet, sticky goodness.
Step 4: Whipping the Cream and Final Touches
In a separate, clean bowl, whip the 80ml of dairy-free whipping cream until it forms soft peaks. You can use an electric mixer or a whisk for this. Be careful not to over-whip, as it can become too stiff. This whipped cream will be used for decoration.
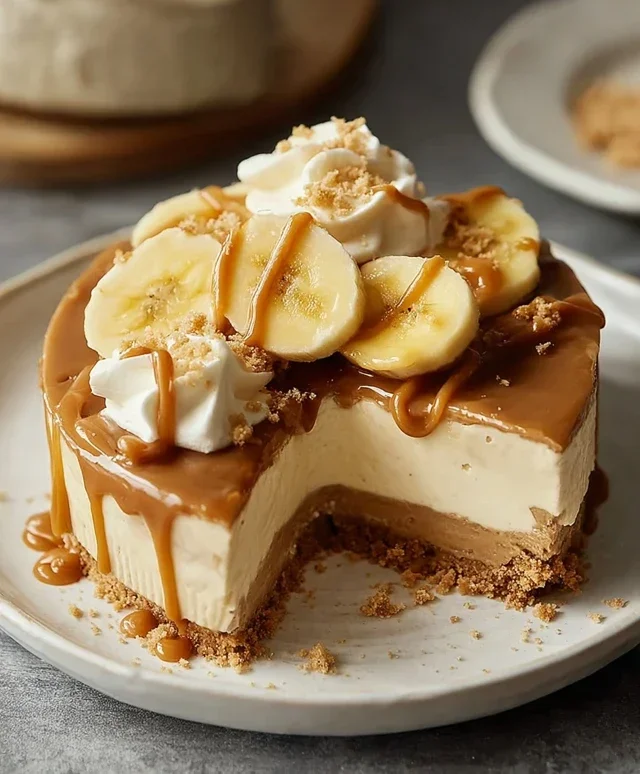
Once the cheesecake has chilled and set (which we’ll cover in the next step), you can add the final decorative touches. Dollop spoonfuls of the whipped dairy-free cream around the top of the cheesecake. Arrange fresh banana slices artfully on top of the whipped cream. Finally, give it another generous drizzle of vegan caramel sauce for that irresistible finishing touch. This is where you can really get creative with your presentation!
Step 5: Chilling for Perfection
This is the most important step for any no-bake cheesecake: chilling. Carefully cover the springform tin with cling film, ensuring it’s well senon-alcoholic aled. Place the cheesecake in the refrigerator and let it chill for a minimum of 4 hours, or preferably overnight. The longer it chills, the firmer and more set the cheesecake will become. This extended chilling time allows the flavours to meld together beautifully and the filling to reach that perfect, sliceable consistency. When you’re ready to serve, carefully release the sides of the springform tin. You can then slice your no-bake Banoffee Cheesecake and enjoy this decadent, dairy-free treat! It’s a perfect dessert for parties, special occasions, or simply when you’re craving something utterly delicious.
Conclusion:
And there you have it – a truly spectacular No-Bake Banoffee Cheesecake that’s guaranteed to impress without the stress of baking! This recipe is fantastic because it delivers all the decadent flavours of a traditional banoffee pie and a creamy cheesecake, yet requires absolutely no oven time. The buttery biscuit base, the rich caramel, the sweet bananas, and the light, fluffy cream cheese topping all come together in perfect harmony. It’s the ultimate dessert for when you want something truly special but don’t want to spend hours in a hot kitchen. I really encourage you to give this a try – you won’t be disappointed!
This No-Bake Banoffee Cheesecake is incredibly versatile when it comes to serving. It’s divine on its own, but I love to add a sprinkle of extra chocolate shavings or a drizzle of extra caramel sauce just before serving for that extra touch of indulgence. For a more elaborate presentation, a few fresh berries on the side can add a lovely pop of colour and a touch of tartness. Don’t be afraid to get creative with variations! You could experiment with different biscuit bases, like gin extractgersnap or digestive biscuits for a spicier kick. For a richer caramel, consider using dulce de leche. And if you’re feeling adventurous, a swirl of chocolate ganache through the cream cheese layer would be simply divine.
Frequently Asked Questions:
Can I make this No-Bake Banoffee Cheesecake ahead of time?
Absolutely! This cheesecake is actually best made the day before you plan to serve it. This allows the flavours to meld beautifully and the cheesecake to set up perfectly. Just cover it tightly with plastic wrap and refrigerate.
What’s the best way to store leftover cheesecake?
Leftover No-Bake Banoffee Cheesecake should be stored in an airtight container in the refrigerator. It will keep well for up to 3-4 days, though I doubt you’ll have any leftovers for that long!
Can I use a different type of biscuit for the base?
Yes, you can! While digestive biscuits are traditional and work wonderfully, feel free to experiment. Grabeef ham crackers or even shortbread biscuits would also make a delicious base for this No-Bake Banoffee Cheesecake.
No-Bake Banoffee Cheesecake
A delicious and easy no-bake cheesecake with layers of biscuit base, creamy cashew filling, banana, and luscious caramel.
Ingredients
-
200g plain biscuits (use gluten-free biscuits if required)
-
100g dairy-free butter or margarine
-
140g cashew nuts (pre-soaked in warm water overnight)
-
340g dairy-free cream cheese
-
50g coconut cream
-
80g icing sugar
-
1 medium-sized banana
-
Vegan caramel sauce
-
Fresh banana slices
-
80ml dairy-free whipping cream
Instructions
-
Step 1
Crush the plain biscuits and mix with melted dairy-free butter or margarine. Press this mixture into the base of a springform tin. -
Step 2
Drain the pre-soaked cashew nuts. Blend them with dairy-free cream cheese, coconut cream, and icing sugar until smooth and creamy. -
Step 3
Spread half of the cashew mixture over the biscuit base. Layer with slices of one medium-sized banana. -
Step 4
Drizzle a generous amount of vegan caramel sauce over the banana slices. -
Step 5
Add the remaining cashew mixture on top and smooth it out. Chill in the refrigerator for at least 4 hours, or until firm. -
Step 6
Whip the dairy-free whipping cream until soft peaks form. Decorate the top of the cheesecake with swirls of whipped cream and fresh banana slices. Drizzle with more vegan caramel sauce.
Important Information
Nutrition Facts (Per Serving)
It is important to consider this information as approximate and not to use it as definitive health advice.
Allergy Information
Please check ingredients for potential allergens and consult a health professional if in doubt.