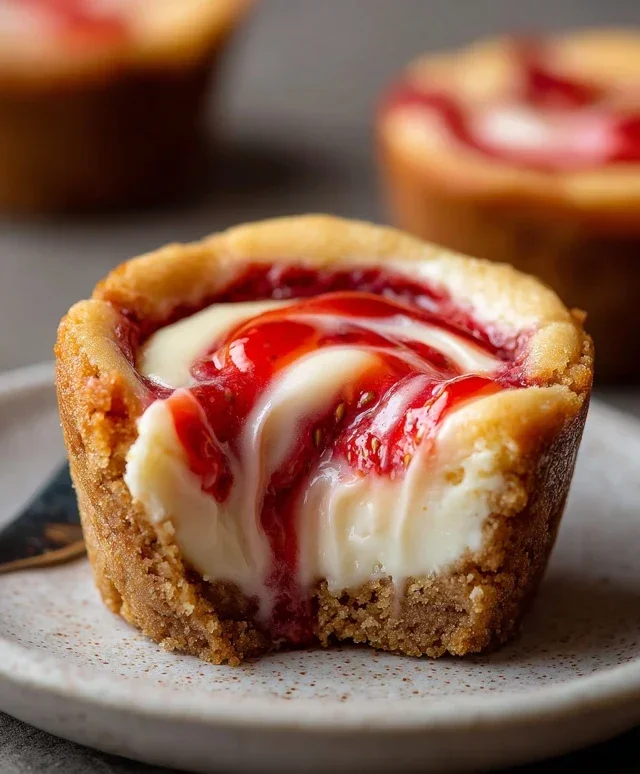
Strawberry Swirl Cheesecake Cookie Cups – Easy Treat
Strawberry swirl cheesecake cookie cups are the perfect convergence of two beloved desserts, offering a delightful and surprisingly simple way to satisfy your sweet cravings. Imagin extracte the rich, creamy tang of cheesecake nestled within a buttery, chewy cookie base, all swirled with vibrant, sweet strawberry goodness. Who can resist such a magical combination? These delightful treats are a crowd-pleaser for a reason; they deliver all the decadent flavor of a full-sized cheesecake and a classic cookie, but in an adorable, single-serving package that’s perfect for parties, potlucks, or just a special afternoon treat. What truly sets these strawberry swirl cheesecake cookie cups apart is their effortless elegance. They look like they’ve come straight from a high-end bakery, yet they’re remarkably easy to whip up in your own kitchen, promising pure joy with every single bite.
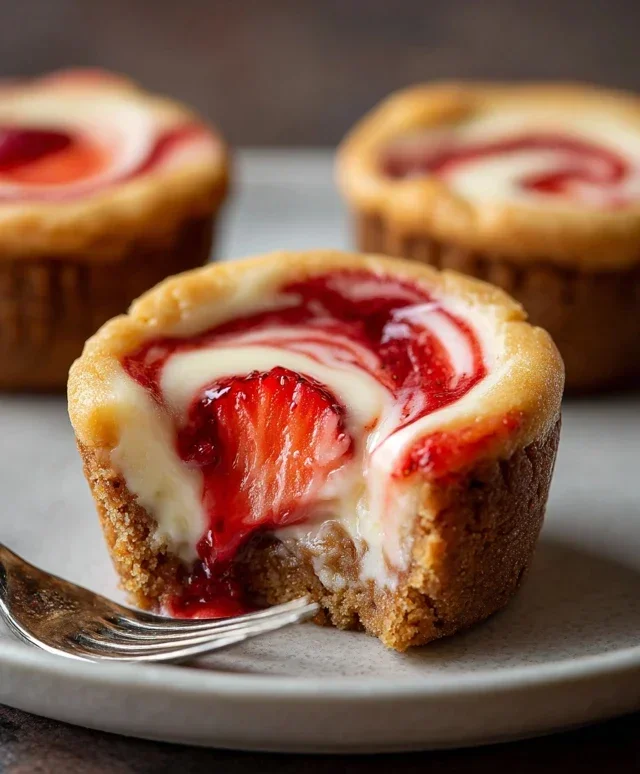
Strawberry Swirl Cheesecake Cookie Cups
Get ready to indulge in a treat that perfectly marries the comforting chegrape juicess of a sugar cookie with the rich, tangy delight of cheesecake, all swirled with vibrant strawberry flavor. These Strawberry Swirl Cheesecake Cookie Cups are surprisingly simple to make and are guaranteed to impress. They’re perfect for parties, potlucks, or simply for treating yourself to something truly special. The combination of textures and flavors is just divine – a crisp cookie edge giving way to a creamy, sweet filling. Let’s dive in and create these little masterpieces!
Ingredients:
Cookie Cup Base
First, we need to prepare the base for our delightful cookie cups. The beauty of using refrigerated sugar cookie dough is its convenience, but feel free to use your favorite homemade sugar cookie dough recipe if you prefer. The key here is to get the dough into a muffin tin to create those perfect cup shapes. I like to preheat my oven to 350°F (175°C) and lightly grease a standard 12-cup muffin tin. This prevents any sticking and ensures our cookie cups pop out cleanly. I usually take about 1 to 1.5 tablespoons of the sugar cookie dough and gently press it into the bottom and up the sides of each muffin cup. You want to create a nice, even layer that will form the “cup.” Make sure the dough is pressed firmly to prevent it from falling apart during baking. If the dough is a bit sticky, a light dusting of flour on your fingers can help. Don’t worry if they aren’t perfectly smooth; a slightly rustic look adds to their charm. We’re going to bake these for about 10-12 minutes, or until the edges are lightly golden brown. We want them cooked through but not overly crispy, as they’ll continue to firm up as they cool. Once baked, let them cool in the muffin tin for about 5 minutes before carefully transferring them to a wire rack to cool completely. This initial cooling period in the tin helps them maintain their shape.
Creamy Cheesecake Filling
While our cookie cups are cooling, we can whip up the luscious cheesecake filling. This is where the magic happens! In a medium bowl, combine the softened cream cheese with the granulated sugar and vanilla extract. Using an electric mixer, whether it’s a hand mixer or a stand mixer with the paddle attachment, is the easiest way to get a super smooth and creamy consistency. Beat them together until there are no lumps of cream cheese visible and the mixture is light and fluffy. This step is crucial for a silky smooth filling that complements the cookie base beautifully. Make sure your cream cheese is truly softened; this allows it to incorporate better and avoid those pesky lumps. If you don’t have an electric mixer, you can use a sturdy whisk and a lot of elbow grease, but be prepared for a bit more effort. Once you have that perfectly smooth cream cheese mixture, set it aside. It’s going to be the luscious layer that sits atop our cookie cups.
The Strawberry Swirl
Now for the star of the show – the strawberry swirl! Gently warming the strawberry jam makes it easier to drizzle and swirl. You can do this in a small saucepan over low heat for a minute or two, or in the microwave in short bursts, stirring in between. Just a few seconds is usually enough to loosen it up. We don’t want it piping hot, just warm enough to be easily pourable. Once your jam is warmed and your cookie cups are completely cool, it’s time to assemble. Spoon about 1 to 2 tablespoons of the cream cheese filling into each cooled cookie cup. Don’t overfill them, as we need space for the jam! Then, take your warmed strawberry jam and drizzle it over the top of the cream cheese filling. Get creative with your drizzle – you can make random lines, or try to form a more intricate pattern. The real fun comes next: using a toothpick or a skewer, gently swirl the jam into the cream cheese. Drag the toothpick through the jam and cream cheese in a swirling motion. This creates that beautiful, marbled effect that makes these cookie cups so visually appealing. Be careful not to over-swirl, as you still want distinct ribbons of strawberry and cream cheese.
Chilling and Serving
Once all your cookie cups are filled and swirled, it’s time to let them set. Pop the muffin tin back into the refrigerator and let them chill for at least 30 minutes. This chilling time is important for the cheesecake filling to firm up and for the flavors to meld together. It also makes them easier to remove from the muffin tin if you haven’t already done so. For an extra special touch, you can garnish your Strawberry Swirl Cheesecake Cookie Cups with a fresh strawberry half or a sprinkle of chocolate shavings just before serving. These are best enjoyed chilled, but they are also delicious at room temperature. They can be made a day in advance and stored in an airtight container in the refrigerator. This is a fantastic make-ahead dessert that will surely be a hit!
Conclusion:
There you have it – the recipe for these absolutely delightful Strawberry Swirl Cheesecake Cookie Cups! These treats are a perfect marriage of creamy cheesecake filling and a buttery, crum extractbly cookie base, all swirled with vibrant, tangy strawberry goodness. I truly believe these are a showstopper for any occasion, whether it’s a family gathering, a potluck, or just a well-deserved afternoon pick-me-up. The individual portions make them incredibly easy to serve, and the combination of textures and flavors is simply irresistible. They’re a fantastic way to impress your friends and family without requiring hours of complicated baking!
I love serving these Strawberry Swirl Cheesecake Cookie Cups chilled, perhaps with a dollop of whipped cream or a few fresh strawberry slices on top for an extra touch of elegance. They are also wonderfully portable, making them ideal for picnics or bake snon-alcoholic ales. Don’t be afraid to experiment with variations! You could swap the strawberry swirl for raspberry, blueberry, or even a chocolate ganache. Adding a hint of lemon zest to the cheesecake filling can also provide a lovely bright contrast.
I really encourage you to give this recipe a try. You’ll be amazed at how simple yet sophisticated these little cups are. The satisfaction of creating something so delicious from scratch is incredibly rewarding, and I’m confident you’ll be thrilled with the results. Happy baking!
Frequently Asked Questions:
Can I make the cookie dough and cheesecake filling ahead of time?
Yes, absolutely! You can prepare the cookie dough and the cheesecake filling up to 2 days in advance. Store them separately in airtight containers in the refrigerator. This will save you time when you’re ready to assemble and bake your Strawberry Swirl Cheesecake Cookie Cups.
How should I store leftover cookie cups?
Store any leftover Strawberry Swirl Cheesecake Cookie Cups in an airtight container in the refrigerator. They will stay fresh for up to 3-4 days. They are best enjoyed when slightly chilled!
Can I freeze these cookie cups?
While the texture of the cheesecake filling might change slightly upon thawing, you can certainly freeze these cookie cups. Once baked and completely cooled, freeze them in a single layer on a baking sheet until firm, then transfer them to a freezer-safe container or bag. Thaw them in the refrigerator overnight before serving.
Strawberry Swirl Cheesecake Cookie Cups
Deliciously easy no-bake cheesecake cookie cups featuring a swirl of strawberry jam.
Ingredients
-
1 roll (16.5 oz) refrigerated sugar cookie dough or homemade equivalent
-
8 oz cream cheese, softened
-
1/4 cup granulated sugar
-
1 tsp vanilla extract
-
1/3 cup strawberry jam, warmed slightly
-
Fresh strawberries (optional)
-
Chocolate shavings (optional)
Instructions
-
Step 1
Preheat oven to 350°F (175°C). Lightly grease a 12-cup muffin tin. -
Step 2
Press sugar cookie dough evenly into the bottom and up the sides of each muffin cup to form a shell. -
Step 3
In a medium bowl, beat softened cream cheese and granulated sugar until smooth and creamy. Stir in vanilla extract. -
Step 4
Spoon the cream cheese mixture evenly into each cookie dough cup. -
Step 5
Dollop spoonfuls of the warmed strawberry jam over the cream cheese filling in each cup. Use a toothpick to gently swirl the jam into the cream cheese. -
Step 6
Bake for 12-15 minutes, or until the cookie edges are golden brown and the cream cheese is set. Do not overbake. -
Step 7
Let the cookie cups cool in the muffin tin for 10 minutes before carefully removing them to a wire rack to cool completely. -
Step 8
Garnish with fresh strawberries or chocolate shavings, if desired.
Important Information
Nutrition Facts (Per Serving)
It is important to consider this information as approximate and not to use it as definitive health advice.
Allergy Information
Please check ingredients for potential allergens and consult a health professional if in doubt.