Korean Cream Cheese Garlic Buns-Irresistible Garlic Bread
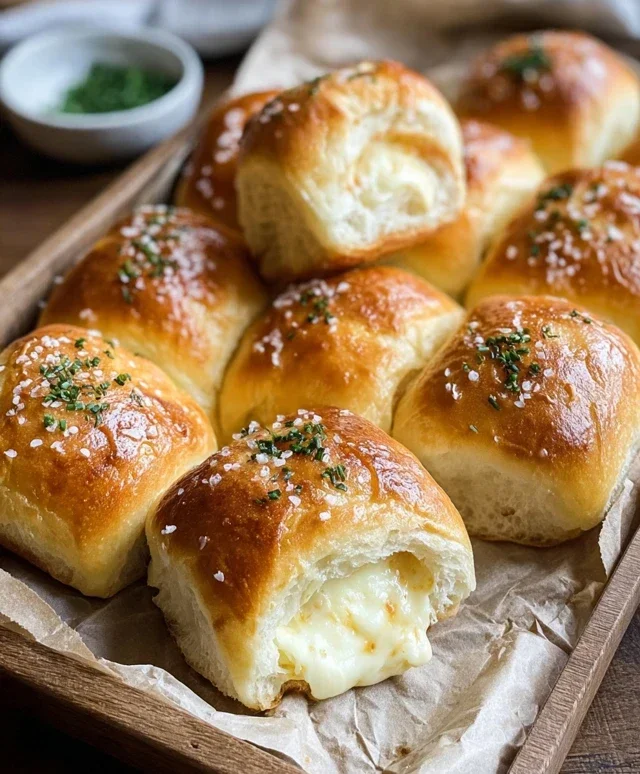
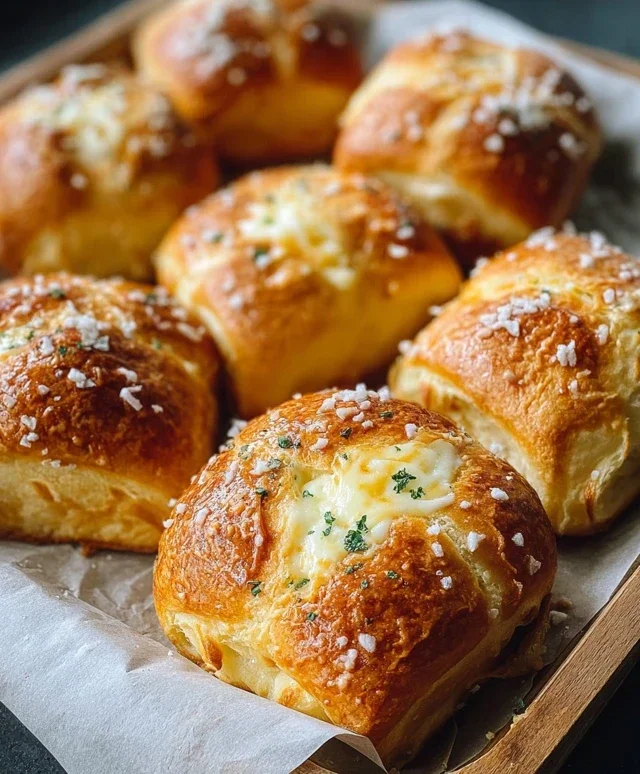
Korean Cream Cheese Garlic Buns are the ultimate comfort food, and I’m so excited to share this recipe with you! If you’ve ever experienced the pure bliss of these sweet, savory, and ridiculously decadent buns, you already know why they’ve taken the internet by storm. They’re not just a snack; they’re an experience. Imagin extracte biting into a cloud-like bun, perfectly toasted on the outside, giving way to a creamy, slightly sweet cream cheese filling, all enveloped in a fragrant, garlicky, buttery glaze. It’s this incredible symphony of flavors and textures that makes Korean Cream Cheese Garlic Buns so addictive. The perfect balance of richness from the cream cheese, the pungent warmth of garlic, and that irresistible sweetness is what sets these apart from any other bun you’ve ever tasted. Get ready to impress yourself and everyone you know with these showstoppers!
Korean Cream Cheese Garlic Buns
Get ready to indulge in a treat that’s taking the internet by storm – Korean Cream Cheese Garlic Buns! These fluffy, sweet rolls are infused with a rich, creamy garlic butter sauce and a delightful cream cheese filling. They’re the perfect balance of sweet, savory, and utterly addictive. I’ve been obsessed with recreating this popular street food snack at home, and after a few tries, I’ve perfected a recipe that delivers on all the deliciousness. They’re surprisingly simple to make, and the aroma that fills your kitchen as they bake is absolutely divine. Perfect for a weekend treat, a party appetizer, or just when you need a serious comfort food moment. Let’s dive in and make these irresistible buns!
Ingredients:
Cooking Instructions:
This recipe is divided into a few key stages: preparing the cream cheese filling, creating the glorious garlic butter sauce, assembling the buns, and finally, baking them to golden perfection.
Step 1: Crafting the Creamy Filling
The first step is to create that decadent cream cheese filling. In a medium bowl, combine your softened cream cheese, 2-3 tablespoons of sweetened condensed milk, and a tiny pinch of salt. Make sure your cream cheese is truly at room temperature; this is crucial for a smooth, lump-free filling. If it’s still a bit firm, you can gently microwave it for about 10-15 seconds, but be careful not to melt it. Use a spatula or a whisk to beat the ingredients together until they are perfectly smooth and creamy. Taste it as you go – you might prefer a touch more sweetness from the condensed milk, so adjust to your liking. Set this glorious filling aside for now.
Step 2: Whipping Up the Irresistible Garlic Butter Sauce
Now, let’s get to the star of the show – that intensely flavorful garlic butter sauce! In a separate bowl, whisk together the melted butter, the large egg, and 1/4 cup of milk. The egg helps to emulsify the sauce and give it a lovely richness. Next, add in the 2 tablespoons of sweetened condensed milk. This adds a subtle sweetness that beautifully complements the savory garlic and butter. Now for the garlic – add your chopped or minced garlic. The amount here is really up to you and how much you love that garlicky punch! Stir in the 1/2 teaspoon of salt, the chopped fresh parsley for a burst of color and freshness, the paprika for a hint of warmth and color, and the grated parmesan cheese. Whisk everything together until it’s all well combined. This sauce is going to be the bathing liquid for our buns, so you want it to be rich and aromatic.
Step 3: Preparing the Sweet Rolls for Their Transformation
This is where those King’s Hawaiian Sweet Rolls come into play! The recipe suggests ideally drying them out at room temperature for about 2 hours. This step is key because it prevents the buns from becoming too soggy when they soak in the garlic butter sauce. It allows them to absorb more of that deliciousness without falling apart. If you’re short on time, you can skip this, but I highly recommend it for the best texture. Once they’ve had their drying time, you’ll need to prepare them for stuffing. Carefully slice each roll horizontally, almost all the way through, creating a pocket for the cream cheese filling. Think of it like a little door you’re opening. Be gentle to keep the rolls intact.
Step 4: Assembling Your Masterpieces
Now for the fun part: assembly! Take each sliced roll and generously spoon a dollop of your prepared cream cheese filling into the pocket you created. Don’t be shy with the filling; it’s what makes these buns so special. Once all your rolls are filled with the creamy goodness, it’s time to introduce them to the garlic butter bath. Arrange the filled rolls snugly in a baking dish, making sure they are touching each other. This helps them steam and bake evenly. Now, generously pour the garlic butter sauce all over the tops and sides of the rolls, ensuring that as much of each bun as possible gets coated. You can use a spoon to help distribute the sauce and get it into all the nooks and crannies.
Step 5: Baking to Golden Perfection
Preheat your oven to 350°F (175°C). Once your oven is ready, place the baking dish into the preheated oven. Bake for approximately 15-20 minutes, or until the tops of the buns are golden brown and slightly crisp, and the garlic butter sauce is bubbling and fragrant. Keep an eye on them towards the end of the baking time, as ovens can vary. You want them to be beautifully golden, but not burnt. The aroma that will emanate from your oven during this time is truly heavenly and will have everyone eagerly anticnon-alcoholic ipating the first bite. Once baked, let them cool slightly in the baking dish for a few minutes before serving. These are best enjoyed warm, when the cream cheese is melty and the garlic butter sauce is at its most luscious. Enjoy every single bite of these incredibly addictive Korean Cream Cheese Garlic Buns!
Conclusion:
There you have it – your guide to creating these utterly irresistible Korean Cream Cheese Garlic Buns! I truly believe this recipe is a winner because it perfectly balances the savory punch of garlic and butter with the delightful tang of cream cheese, all encased in a pillowy soft bun. The aroma alone as they bake is enough to make your kitchen feel like a gourmet bakery. These buns are incredibly versatile, making them a fantastic appetizer, a satisfying snack, or even a delightful accompaniment to a hearty soup or stew. Don’t hesitate to get creative with the variations; I’ve seen amazing additions like a sprinkle of chopped chives or a drizzle of honey added just before serving. I encourage you all to give this a try – I promise you won’t regret it. They are surprisingly simple to make and the payoff in deliciousness is immense!
Frequently Asked Questions about Korean Cream Cheese Garlic Buns:
Can I make the dough ahead of time?
Absolutely! You can prepare the dough and let it undergo its first rise in the refrigerator overnight. This slow, cold fermentation can actually enhance the flavor and texture of the buns. Just bring it to room temperature for about an hour before shaping and proceeding with the recipe.
What kind of cream cheese should I use?
Full-fat cream cheese is generally recommended for the best texture and richness in the filling. Make sure it’s softened to room temperature for easy mixing and to avoid lumps. Low-fat versions might result in a less creamy filling.
Can I freeze baked buns?
Yes, you can freeze baked and cooled Korean Cream Cheese Garlic Buns. Wrap them tightly in plastic wrap and then place them in a freezer-safe bag or container. To reheat, you can thaw them at room temperature and then warm them in a low oven or a toaster oven until heated through.
Korean Cream Cheese Garlic Buns
Sweet and savory Korean-style garlic buns with a creamy cream cheese filling.
Ingredients
-
16 King’s Hawaiian Original Hawaiian Sweet Rolls, ideally dried out at room temperature for 2 hours
-
8 oz (226g) cream cheese, room temperature
-
2-3 tablespoons sweetened condensed milk, to taste
-
Pinch of salt
-
1/2 cup (113g) butter, melted
-
1 large egg
-
1/4 cup milk
-
2 tablespoons sweetened condensed milk
-
2-3 tablespoons chopped or minced garlic
-
1/2 teaspoon salt
-
2 tablespoons fresh parsley, chopped
-
1/2 teaspoon paprika
-
2 tablespoons grated or shredded parmesan cheese
Instructions
-
Step 1
Prepare the cream cheese filling: In a medium bowl, combine the softened cream cheese, 2-3 tablespoons of sweetened condensed milk, and a pinch of salt. Mix until smooth and creamy. -
Step 2
Prepare the sweet rolls: Carefully slice each sweet roll in half horizontally without cutting all the way through. Spread a generous amount of the cream cheese filling into each bun. -
Step 3
Prepare the garlic butter wash: In a separate bowl, whisk together the melted butter, egg, 1/4 cup milk, 2 tablespoons sweetened condensed milk, minced garlic, 1/2 teaspoon salt, chopped parsley, paprika, and parmesan cheese. -
Step 4
Assemble the buns: Arrange the filled sweet rolls in a baking dish or on a baking sheet lined with parchment paper. -
Step 5
Bake the buns: Brush the tops and sides of each bun generously with the garlic butter mixture. Bake in a preheated oven at 350°F (175°C) for 15-20 minutes, or until golden brown and heated through. -
Step 6
Serve warm and enjoy.
Important Information
Nutrition Facts (Per Serving)
It is important to consider this information as approximate and not to use it as definitive health advice.
Allergy Information
Please check ingredients for potential allergens and consult a health professional if in doubt.