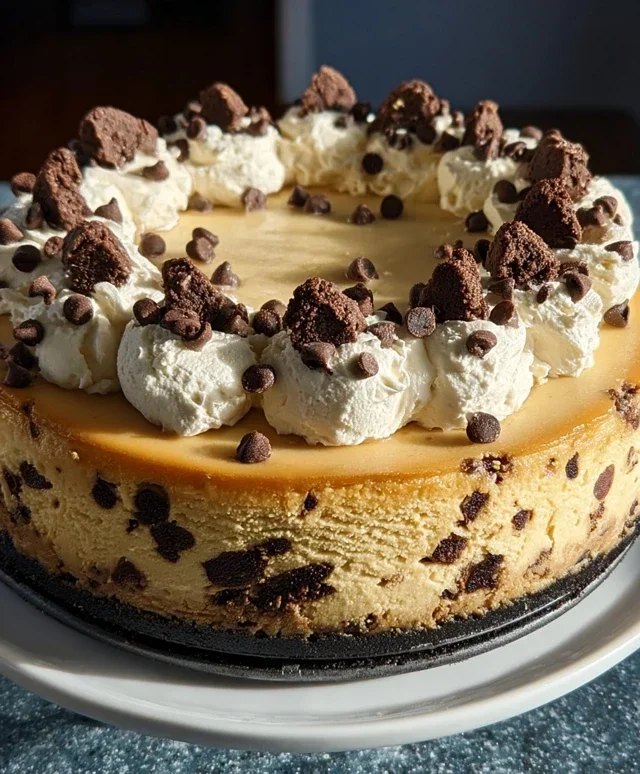
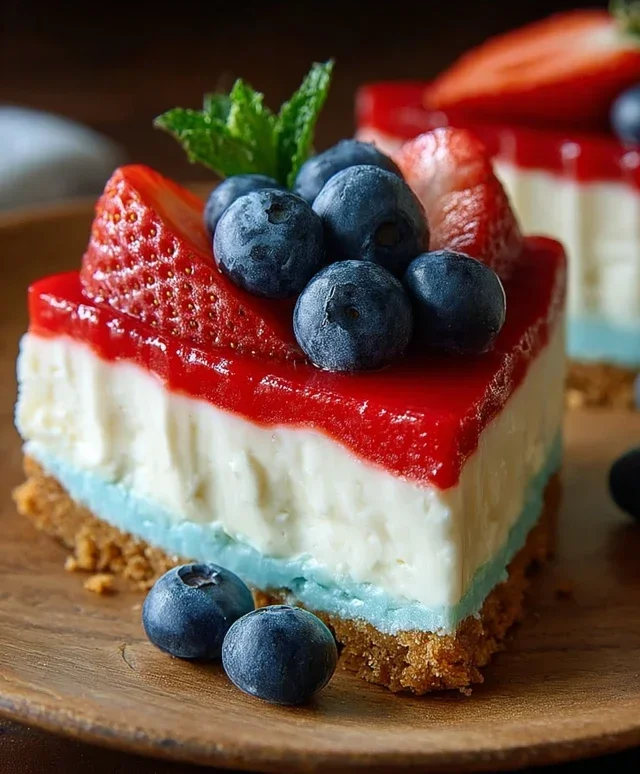
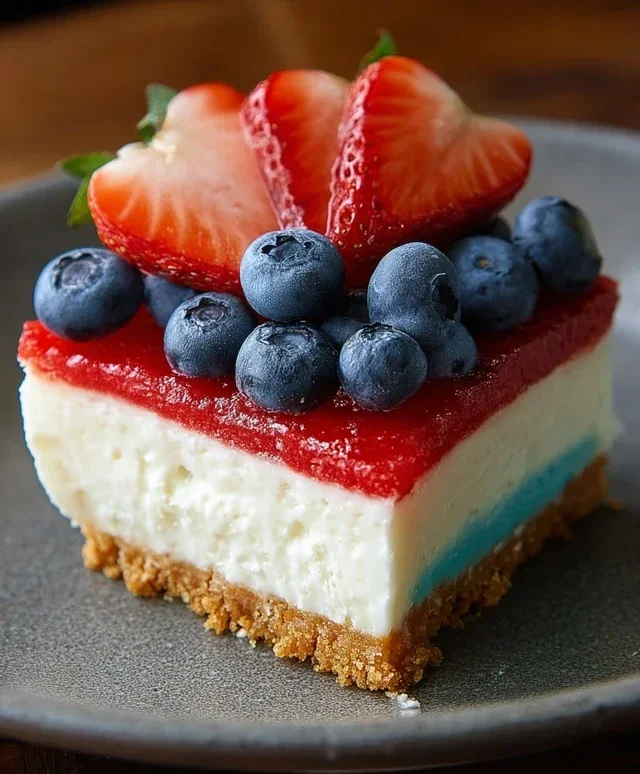
No-Bake Patriotic Cheesecake Recipe – Easy & Delicious
No Bake Patriotic Cheesecake is the ultimate crowd-pleaser for any summer celebration, and I’m so excited to share my favorite recipe with you! There’s just something magical about a no-bake dessert that tastes as spectacular as it looks, and this patriotic version truly outshines the rest. We all love cheesecake, but the creamy, dreamy texture achieved without even turning on the oven is a game-changer. What truly makes this No Bake Patriotic Cheesecake special is its stunning visual appeal, adorned with vibrant red, white, and blue layers that scream “America!” It’s the perfect dessert for your Fourth of July barbecue, Memorial Day picnic, or any occasion where you want to add a touch of festive flair. Forget the stress of water baths and cracked crusts; this recipe is designed for maximum deliciousness with minimal fuss, making it ideal for both begin extractner bakers and seasoned pros looking for a show-stopping, easy-to-make treat.
No Bake Patriotic Cheesecake
Celebrate the red, white, and blue with this incredibly easy and utterly delicious No Bake Patriotic Cheesecake! This dessert is perfect for any summer gathering, Fourth of July celebration, or any time you want a show-stopping treat that requires absolutely no oven time. The creamy cheesecake filling, vibrant layers, and sweet crunch of the crust make this a guaranteed crowd-pleaser. Plus, it’s so simple to put together, even begin extractner bakers can achieve impressive results. Let’s get started and create a beautiful dessert that tastes as good as it looks!
Ingredients:
Crust Preparation: A Sweet Foundation
The base of our no-bake cheesecake is a delightful golden Oreo crust. The subtle sweetness of the golden Oreos combined with a hint of salt provides a perfect counterpoint to the rich cheesecake filling.
1. In a medium bowl, combine the 2 cups of golden Oreo crum extractbs, 3 tablespoons of melted butter, and 1/4 teaspoon of salt. Stir until all the crum extractbs are evenly moistened. This mixture should resemble wet sand. It’s important to ensure all the crum extractbs are coated in butter for a cohesive crust.
2. Press this mixture evenly into the bottom of a 9-inch springform pan. Use the bottom of a glass or a flat measuring cup to really pack it down firmly. A well-compacted crust is essential for preventing it from falling apart when you slice the cheesecake. You can also press a small amount up the sides of the pan if you prefer a slightly thicker crust wall, though this is entirely optional. Place the prepared crust in the refrigerator to chill and firm up while you prepare the filling. This chilling step is crucial for a firm crust.
Creamy Cheesecake Filling: The Heart of the Dessert
This is where the magic happens! We’re creating a lusciously smooth and decadent cheesecake filling that’s light and airy, thanks to the whipped cream.
1. In a large bowl, beat the 2 packages (8 oz each) of softened cream cheese with an electric mixer on medium speed until it’s completely smooth and free of lumps. Make sure your cream cheese is truly softened; this will make it much easier to work with and prevent any grainy texture in your filling.
2. Gradually add the 2 cups of powdered sugar to the cream cheese, beating until well combined and smooth. Scrape down the sides of the bowl occasionally to ensure everything is incorporated.
3. Stir in the 2 teaspoons of vanilla extract. This adds a wonderful depth of flavor to the cheesecake.
4. In a separate, clean bowl, whip the 2 cups of heavy whipping cream until stiff peaks form. Be careful not to over-whip, or you’ll end up with butter! Stiff peaks mean that when you lift the beaters, the cream holds its shape and the peaks stand straight up.
5. Gently fold about one-third of the whipped cream into the cream cheese mixture. This lightens the cream cheese base. Then, carefully fold in the remaining whipped cream until just combined. Be gentle when folding to maintain the airy texture of the whipped cream. The goal is a smooth, creamy, and light filling.
Creating the Patriotic Layers: A Burst of Color
Now, let’s divide our filling and add those vibrant patriotic colors!
1. Divide the cheesecake filling into two equal portions in separate bowls.
2. To one portion of the filling, add the 1 teaspoon of red gel food color. Stir gently until the color is evenly distributed and you have a vibrant red hue. Gel food coloring is recommended as it provides intense color without adding extra liquid, which could alter the cheesecake’s texture.
3. Set aside the uncolored portion of the filling for our white layer.
The Blue Swirl: A Fruity and Tangy Surprise
This blue layer adds a delightful tang and visual appeal, reminiscent of summer berries.
1. In a small heatproof bowl, combine the 1 package (3.94 oz) of blue raspberry Jell-O with 1 cup of boiling water. Stir vigorously until the Jell-O powder is completely dissolved. This is very important to avoid any grainy texture in your blue layer.
2. Let this Jell-O mixture cool for about 10-15 minutes, or until it’s no longer steaming hot but still liquid. You don’t want it to be too hot when you add it to the cheesecake filling, as it could melt the cream cheese.
Assembling Your Masterpiece: Layer by Layer
The assembly is the fun, visual part! We’ll carefully layer our colors to create that iconic patriotic look.
1. Retrieve the chilled crust from the refrigerator.
2. Dollop spoonfuls of the red cheesecake filling and the plain white cheesecake filling alternately over the crust. Don’t worry about making it perfect at this stage; we’ll blend them slightly.
3. Gently swirl a toothpick or a knife through the red and white layers to create a marbled effect. Be careful not to over-swirl, or the colors will blend too much. You want distinct streaks of red and white.
4. Now, carefully spoon the cooled blue raspberry Jell-O mixture over the swirled red and white layers. Again, don’t worry about perfectly even coverage. The Jell-O will settle and spread slightly on its own.
5. Cover the springform pan tightly with plastic wrap and refrigerate for at least 6 hours, or preferably overnight, until the cheesecake is firm and set. This chilling time is critical for the cheesecake to firm up properly.
The White Chocolate “Frosting”: A Sweet Finish
While the cheesecake chills, we’ll prepare a simple, sweet white topping that adds another layer of flavor and a classic finishing touch.
1. In a medium bowl, beat the 6 oz of softened cream cheese with the 6 tablespoons of softened butter until smooth and creamy. Ensure both are at room temperature for easy blending.
2. Gradually add the 3 cups of powdered sugar and the 1 teaspoon of vanilla extract, beating until thoroughly combined and smooth. If the mixture seems too thick, you can add a tiny splash of milk or cream (about 1 teaspoon at a time) until it reaches a spreadable consistency.
3. Once the cheesecake is fully set, carefully remove the sides of the springform pan.
4. Spread this white “frosting” evenly over the top of the cheesecake.
5. Finally, decorate the top of the cheesecake with fresh blueberries, arrangin extractg them in a way that complements the red and white layers. You can create stripes, a star shape, or a festive scattered pattern.
Enjoy your spectacular No Bake Patriotic Cheesecake! It’s a truly delightful dessert that’s as fun to make as it is to eat.
Conclusion:
There you have it – a truly delightful No Bake Patriotic Cheesecake that’s perfect for any summer celebration or just to add a touch of festive fun to your dessert table! This recipe is fantastic because it’s incredibly easy to make, requires no oven time, and delivers a beautifully layered, creamy, and utterly delicious cheesecake experience. The vibrant red, white, and blue colors make it a showstopper, and the no-bake nature means less stress and more time to enjoy your guests. I love serving this cheesecake chilled, cut into generous slices, perhaps with a dollop of fresh whipped cream or a sprinkle of extra berries for an added touch of elegance.
Don’t be afraid to get creative with variations! You could try adding a layer of crushed grabeef ham crackers or shortbread cookies to the bottom for an extra crunch, or even incorporate a hint of lemon zest into the cream cheese filling for a brighter flavor. The possibilities are endless when it comes to personalizing this No Bake Patriotic Cheesecake.
So, I wholeheartedly encourage you to give this recipe a try. It’s a foolproof way to impress and delight, and it’s so rewarding to see the smiles on everyone’s faces as they dig into this festive treat. Happy baking… or rather, happy no-baking!
Frequently Asked Questions:
Q: Can I make this No Bake Patriotic Cheesecake ahead of time?
Absolutely! In fact, making it a day in advance is highly recommended. This allows the cheesecake to set properly, ensuring a firm and sliceable texture. Just cover it tightly with plastic wrap and refrigerate until you’re ready to serve.
Q: What kind of berries work best for the patriotic topping?
Strawberries and blueberries are the classic choices for that perfect red, white, and blue effect. You could also consider raspberries for another shade of red, or even some white chocolate shavings for a contrasting texture and color. Just ensure your berries are fresh and dry before layering them on top.
No Bake Patriotic Cheesecake
A vibrant and delicious no-bake cheesecake featuring patriotic red, white, and blue layers, perfect for any celebration.
Ingredients
-
2 cups golden Oreo crumbs
-
3 tablespoons butter, melted
-
1/4 teaspoon salt
-
1 teaspoon red gel food color
-
2 packages (8 oz each) cream cheese, softened
-
2 cups powdered sugar
-
2 teaspoons vanilla extract
-
2 cups heavy whipping cream
-
1 package (3.94 oz) blue raspberry Jell-O
-
1 cup boiling water
-
6 oz cream cheese, softened
-
6 tablespoons butter, softened
-
3 cups powdered sugar
-
1 teaspoon vanilla extract
-
Fresh blueberries
Instructions
-
Step 1
Combine golden Oreo crumbs, melted butter, and salt for the crust. Press into a 9-inch springform pan. -
Step 2
Beat 2 packages cream cheese, 2 cups powdered sugar, and 2 teaspoons vanilla extract until smooth. Whip 2 cups heavy whipping cream to stiff peaks and fold into the cream cheese mixture. -
Step 3
Divide the cream cheese mixture into two portions. Color one portion with red gel food color. -
Step 4
Prepare the blue layer by dissolving blue raspberry Jell-O in boiling water, then stir in 1 cup of cold water. Let it cool slightly. -
Step 5
Spoon dollops of red and white cheesecake mixture over the crust. Gently swirl with a knife. Pour the slightly cooled blue Jell-O mixture over the swirls. -
Step 6
Refrigerate for at least 4 hours, or until firm. -
Step 7
For the white topping, beat 6 oz cream cheese, 6 tablespoons softened butter, 3 cups powdered sugar, and 1 teaspoon vanilla extract until smooth and creamy. Spread or pipe on top of the cheesecake. -
Step 8
Garnish with fresh blueberries before serving.
Important Information
Nutrition Facts (Per Serving)
It is important to consider this information as approximate and not to use it as definitive health advice.
Allergy Information
Please check ingredients for potential allergens and consult a health professional if in doubt.